<?xml version="1.0" encoding="utf-8"?>
<feed xmlns="http://www.w3.org/2005/Atom">
    <id>https://vibekeys.dev/blog/</id>
    <title>VibeKeys Blog</title>
    <updated>2026-07-08T00:00:00.000Z</updated>
    <generator>https://github.com/jpmonette/feed</generator>
    <link rel="alternate" href="https://vibekeys.dev/blog/"/>
    <subtitle>VibeKeys Blog</subtitle>
    <icon>https://vibekeys.dev/img/favicon.ico</icon>
    <entry>
        <title type="html"><![CDATA[How to Update VibeKeys Max for Windows, Codex, and Firmware v0.3.1]]></title>
        <id>https://vibekeys.dev/blog/vibekeys-windows-codex-firmware-update/</id>
        <link href="https://vibekeys.dev/blog/vibekeys-windows-codex-firmware-update/"/>
        <updated>2026-07-08T00:00:00.000Z</updated>
        <summary type="html"><![CDATA[Update VibeKeys Max for Windows support, Codex profiles, and firmware v0.3.1 fixes. Includes download links for VibeKeys app, Vibetty, and firmware update docs.]]></summary>
        <content type="html"><![CDATA[<p>VibeKeys Max now works better across Windows, Codex, and day-to-day key handling. This update covers three pieces: <a class="" href="https://vibekeys.dev/docs/remote-mode/">Vibetty</a>, the remote terminal bridge; VibeKeys app, the desktop configuration tool; and firmware, the software running on the device itself.</p>
<p>This update improves all three:</p>
<ul>
<li class=""><strong>Vibetty</strong> now runs on Windows, so <a class="" href="https://vibekeys.dev/docs/remote-mode/">remote control</a> and voice-driven terminal workflows are no longer limited to macOS and Linux.</li>
<li class=""><strong>VibeKeys app</strong> adds Codex support, including Codex hook mode and a Codex keymap profile for <a class="" href="https://vibekeys.dev/docs/keyboard-mode/">keyboard mode</a>.</li>
<li class=""><strong>VibeKeys firmware v0.3.1</strong> fixes the default MIC key mapping and improves key release handling on the device.</li>
</ul>
<p>If you already have a VibeKeys Max, we recommend updating both the desktop software and the device firmware.</p>
<p>Update links:</p>
<ul>
<li class=""><a href="https://github.com/second-state/vibekeys_app/releases/tag/v0.1.9" target="_blank" rel="noopener noreferrer" class="">VibeKeys app v0.1.9</a></li>
<li class=""><a href="https://github.com/second-state/vibetty/releases/tag/v0.3.3" target="_blank" rel="noopener noreferrer" class="">Vibetty v0.3.3</a></li>
<li class=""><a class="" href="https://vibekeys.dev/docs/flashing-firmware/">Firmware update guide</a></li>
</ul>
<h2 class="anchor anchorTargetStickyNavbar_Vzrq" id="windows-support-in-vibetty">Windows support in Vibetty<a href="https://vibekeys.dev/blog/vibekeys-windows-codex-firmware-update/#windows-support-in-vibetty" class="hash-link" aria-label="Direct link to Windows support in Vibetty" title="Direct link to Windows support in Vibetty" translate="no">​</a></h2>
<p><a class="" href="https://vibekeys.dev/docs/remote-mode/">Vibetty</a> is the local bridge for VibeKeys Max remote control mode. <a href="https://github.com/second-state/vibetty/releases/tag/v0.3.3" target="_blank" rel="noopener noreferrer" class="">Vibetty v0.3.3</a> adds Windows support through ConPTY, and the release includes pre-built binaries for:</p>
<ul>
<li class=""><code>vibetty-windows-x64.exe</code></li>
<li class=""><code>vibetty-macos-arm64</code></li>
<li class=""><code>vibetty-linux-x64</code></li>
</ul>
<p>This matters for <a class="" href="https://vibekeys.dev/docs/remote-mode/">remote control mode</a>. VibeKeys Max should work with the machine you actually code on, whether that is Windows, macOS, or Linux. With this release, the same voice-driven terminal workflow can run across all three platforms.</p>
<p>On Windows, download <code>vibetty-windows-x64.exe</code> from the release page and run it from PowerShell or Command Prompt with your coding agent command, for example:</p>
<div class="language-powershell codeBlockContainer_Ckt0 theme-code-block" style="--prism-color:#bfc7d5;--prism-background-color:#292d3e"><div class="codeBlockContent_QJqH"><pre tabindex="0" class="prism-code language-powershell codeBlock_bY9V thin-scrollbar" style="color:#bfc7d5;background-color:#292d3e"><code class="codeBlockLines_e6Vv"><span class="token-line" style="color:#bfc7d5"><span class="token plain">.\vibetty-windows-x64.exe -- codex</span><br></span></code></pre></div></div>
<p>On macOS or Linux, download the matching binary from the same release and run it with your preferred agent:</p>
<div class="language-bash codeBlockContainer_Ckt0 theme-code-block" style="--prism-color:#bfc7d5;--prism-background-color:#292d3e"><div class="codeBlockContent_QJqH"><pre tabindex="0" class="prism-code language-bash codeBlock_bY9V thin-scrollbar" style="color:#bfc7d5;background-color:#292d3e"><code class="codeBlockLines_e6Vv"><span class="token-line" style="color:#bfc7d5"><span class="token plain">./vibetty-macos-arm64 -- claude</span><br></span><span class="token-line" style="color:#bfc7d5"><span class="token plain"></span><span class="token comment" style="color:rgb(105, 112, 152);font-style:italic"># or</span><span class="token plain"></span><br></span><span class="token-line" style="color:#bfc7d5"><span class="token plain">./vibetty-linux-x64 -- codex</span><br></span></code></pre></div></div>
<h2 class="anchor anchorTargetStickyNavbar_Vzrq" id="codex-support-in-the-vibekeys-app">Codex support in the VibeKeys app<a href="https://vibekeys.dev/blog/vibekeys-windows-codex-firmware-update/#codex-support-in-the-vibekeys-app" class="hash-link" aria-label="Direct link to Codex support in the VibeKeys app" title="Direct link to Codex support in the VibeKeys app" translate="no">​</a></h2>
<p>The <a href="https://github.com/second-state/vibekeys_app/releases/tag/v0.1.9" target="_blank" rel="noopener noreferrer" class="">VibeKeys app v0.1.9</a> adds Codex and Claude keymap profiles. The release includes:</p>
<ul>
<li class=""><code>vibekeys-windows-x64.exe</code></li>
<li class=""><code>vibekeys-macos-arm64</code></li>
<li class=""><code>vibekeys-linux-x64</code></li>
</ul>
<p>After downloading the VibeKeys app for your platform, install or rename the binary as <code>vibekeys</code>, then check that it runs:</p>
<div class="language-bash codeBlockContainer_Ckt0 theme-code-block" style="--prism-color:#bfc7d5;--prism-background-color:#292d3e"><div class="codeBlockContent_QJqH"><pre tabindex="0" class="prism-code language-bash codeBlock_bY9V thin-scrollbar" style="color:#bfc7d5;background-color:#292d3e"><code class="codeBlockLines_e6Vv"><span class="token-line" style="color:#bfc7d5"><span class="token plain">vibekeys </span><span class="token parameter variable" style="color:rgb(191, 199, 213)">--help</span><br></span></code></pre></div></div>
<p>The app's <a href="https://github.com/second-state/vibekeys_app#hook-mode" target="_blank" rel="noopener noreferrer" class="">Hook Mode</a> reads hook JSON events from stdin and forwards them to the VibeKeys Max display. For Codex hook events, run:</p>
<div class="language-bash codeBlockContainer_Ckt0 theme-code-block" style="--prism-color:#bfc7d5;--prism-background-color:#292d3e"><div class="codeBlockContent_QJqH"><pre tabindex="0" class="prism-code language-bash codeBlock_bY9V thin-scrollbar" style="color:#bfc7d5;background-color:#292d3e"><code class="codeBlockLines_e6Vv"><span class="token-line" style="color:#bfc7d5"><span class="token plain">vibekeys codex</span><br></span></code></pre></div></div>
<p>To switch the keyboard to a Codex-focused keymap profile, run:</p>
<div class="language-bash codeBlockContainer_Ckt0 theme-code-block" style="--prism-color:#bfc7d5;--prism-background-color:#292d3e"><div class="codeBlockContent_QJqH"><pre tabindex="0" class="prism-code language-bash codeBlock_bY9V thin-scrollbar" style="color:#bfc7d5;background-color:#292d3e"><code class="codeBlockLines_e6Vv"><span class="token-line" style="color:#bfc7d5"><span class="token plain">vibekeys profile codex</span><br></span></code></pre></div></div>
<p>The <code>codex</code> profile maps <code>CUSTOM</code> to <code>/review</code> + Enter and <code>YOLO</code> to <code>y</code>, so review and approval become physical actions. If you switch back to Claude Code, run:</p>
<div class="language-bash codeBlockContainer_Ckt0 theme-code-block" style="--prism-color:#bfc7d5;--prism-background-color:#292d3e"><div class="codeBlockContent_QJqH"><pre tabindex="0" class="prism-code language-bash codeBlock_bY9V thin-scrollbar" style="color:#bfc7d5;background-color:#292d3e"><code class="codeBlockLines_e6Vv"><span class="token-line" style="color:#bfc7d5"><span class="token plain">vibekeys profile claude</span><br></span></code></pre></div></div>
<p>Only the <code>CUSTOM</code> and <code>YOLO</code> keys are changed by these profiles, so switching between Codex and Claude Code stays predictable.</p>
<h2 class="anchor anchorTargetStickyNavbar_Vzrq" id="firmware-v031">Firmware v0.3.1<a href="https://vibekeys.dev/blog/vibekeys-windows-codex-firmware-update/#firmware-v031" class="hash-link" aria-label="Direct link to Firmware v0.3.1" title="Direct link to Firmware v0.3.1" translate="no">​</a></h2>
<p>The firmware update from <a href="https://github.com/second-state/vibekeys_firmware/compare/v0.3.0...v0.3.1" target="_blank" rel="noopener noreferrer" class="">v0.3.0 to v0.3.1</a> focuses on device reliability:</p>
<ul>
<li class="">fixes the default MIC key mapping</li>
<li class="">fixes a case where a key release event could be missed during screen refresh</li>
<li class="">bumps the firmware version to v0.3.1</li>
</ul>
<p>The key release fix is especially important for a physical controller. If the display refreshes while you press and release a key, the firmware now handles that state more reliably.</p>
<h2 class="anchor anchorTargetStickyNavbar_Vzrq" id="how-to-update-vibekeys-max">How to update VibeKeys Max<a href="https://vibekeys.dev/blog/vibekeys-windows-codex-firmware-update/#how-to-update-vibekeys-max" class="hash-link" aria-label="Direct link to How to update VibeKeys Max" title="Direct link to How to update VibeKeys Max" translate="no">​</a></h2>
<p>This update has three parts: update the VibeKeys app, update Vibetty if you use <a class="" href="https://vibekeys.dev/docs/remote-mode/">remote control mode</a>, and update the firmware on the device.</p>
<h3 class="anchor anchorTargetStickyNavbar_Vzrq" id="1-update-the-vibekeys-app">1. Update the VibeKeys app<a href="https://vibekeys.dev/blog/vibekeys-windows-codex-firmware-update/#1-update-the-vibekeys-app" class="hash-link" aria-label="Direct link to 1. Update the VibeKeys app" title="Direct link to 1. Update the VibeKeys app" translate="no">​</a></h3>
<p>Download <a href="https://github.com/second-state/vibekeys_app/releases/tag/v0.1.9" target="_blank" rel="noopener noreferrer" class="">VibeKeys app v0.1.9</a> for your platform:</p>
<ul>
<li class=""><code>vibekeys-windows-x64.exe</code> for Windows</li>
<li class=""><code>vibekeys-macos-arm64</code> for Apple Silicon Macs</li>
<li class=""><code>vibekeys-linux-x64</code> for Linux x64</li>
</ul>
<p>This is the tool you use for keyboard configuration, Codex profiles, ASR settings, WiFi settings, and BLE control in <a class="" href="https://vibekeys.dev/docs/keyboard-mode/">keyboard mode</a>. After updating it, check that it runs:</p>
<div class="language-bash codeBlockContainer_Ckt0 theme-code-block" style="--prism-color:#bfc7d5;--prism-background-color:#292d3e"><div class="codeBlockContent_QJqH"><pre tabindex="0" class="prism-code language-bash codeBlock_bY9V thin-scrollbar" style="color:#bfc7d5;background-color:#292d3e"><code class="codeBlockLines_e6Vv"><span class="token-line" style="color:#bfc7d5"><span class="token plain">vibekeys </span><span class="token parameter variable" style="color:rgb(191, 199, 213)">--help</span><br></span></code></pre></div></div>
<h3 class="anchor anchorTargetStickyNavbar_Vzrq" id="2-update-vibetty">2. Update Vibetty<a href="https://vibekeys.dev/blog/vibekeys-windows-codex-firmware-update/#2-update-vibetty" class="hash-link" aria-label="Direct link to 2. Update Vibetty" title="Direct link to 2. Update Vibetty" translate="no">​</a></h3>
<p>If you use VibeKeys Max in <a class="" href="https://vibekeys.dev/docs/remote-mode/">remote control mode</a>, download <a href="https://github.com/second-state/vibetty/releases/tag/v0.3.3" target="_blank" rel="noopener noreferrer" class="">Vibetty v0.3.3</a>:</p>
<ul>
<li class=""><code>vibetty-windows-x64.exe</code> for Windows</li>
<li class=""><code>vibetty-macos-arm64</code> for Apple Silicon Macs</li>
<li class=""><code>vibetty-linux-x64</code> for Linux x64</li>
</ul>
<p>This is the tool that runs the local terminal bridge for Claude Code, Codex, or another terminal program.</p>
<h3 class="anchor anchorTargetStickyNavbar_Vzrq" id="3-update-the-firmware">3. Update the firmware<a href="https://vibekeys.dev/blog/vibekeys-windows-codex-firmware-update/#3-update-the-firmware" class="hash-link" aria-label="Direct link to 3. Update the firmware" title="Direct link to 3. Update the firmware" translate="no">​</a></h3>
<p>Firmware updates happen on the VibeKeys Max device itself. There are two supported methods:</p>
<ul>
<li class=""><strong>OTA update</strong>: recommended if your device is working and can connect to WiFi.</li>
<li class=""><strong>ESP LaunchPad</strong>: use this for recovery, factory reset, or when OTA does not work.</li>
</ul>
<p>Follow the full firmware guide here: <a class="" href="https://vibekeys.dev/docs/flashing-firmware/">Updating VibeKeys Firmware</a>.</p>
<h2 class="anchor anchorTargetStickyNavbar_Vzrq" id="why-this-update-matters">Why this update matters<a href="https://vibekeys.dev/blog/vibekeys-windows-codex-firmware-update/#why-this-update-matters" class="hash-link" aria-label="Direct link to Why this update matters" title="Direct link to Why this update matters" translate="no">​</a></h2>
<p>This update makes VibeKeys less tied to one operating system and one coding agent. Vibetty now reaches Windows users. VibeKeys app now understands Codex workflows. Firmware v0.3.1 improves the physical key behavior on the device itself.</p>
<p>That is the direction for VibeKeys: the repetitive parts of AI coding should become physical, fast, and easy to reach, whether you are using Claude Code, Codex, macOS, Linux, or Windows.</p>]]></content>
        <author>
            <name>VibeKeys Team</name>
            <uri>https://vibekeys.dev</uri>
        </author>
        <category label="product-update" term="product-update"/>
        <category label="windows" term="windows"/>
        <category label="codex" term="codex"/>
        <category label="firmware" term="firmware"/>
        <category label="vibetty" term="vibetty"/>
    </entry>
    <entry>
        <title type="html"><![CDATA[VibeKeys Max Now Works with Codex]]></title>
        <id>https://vibekeys.dev/blog/vibekeys-codex-profiles/</id>
        <link href="https://vibekeys.dev/blog/vibekeys-codex-profiles/"/>
        <updated>2026-07-01T00:00:00.000Z</updated>
        <summary type="html"><![CDATA[Product update: VibeKeys Max now supports OpenAI Codex — tap y instead of typing it, /review on one key, and one command to switch your keypad between Codex and Claude Code.]]></summary>
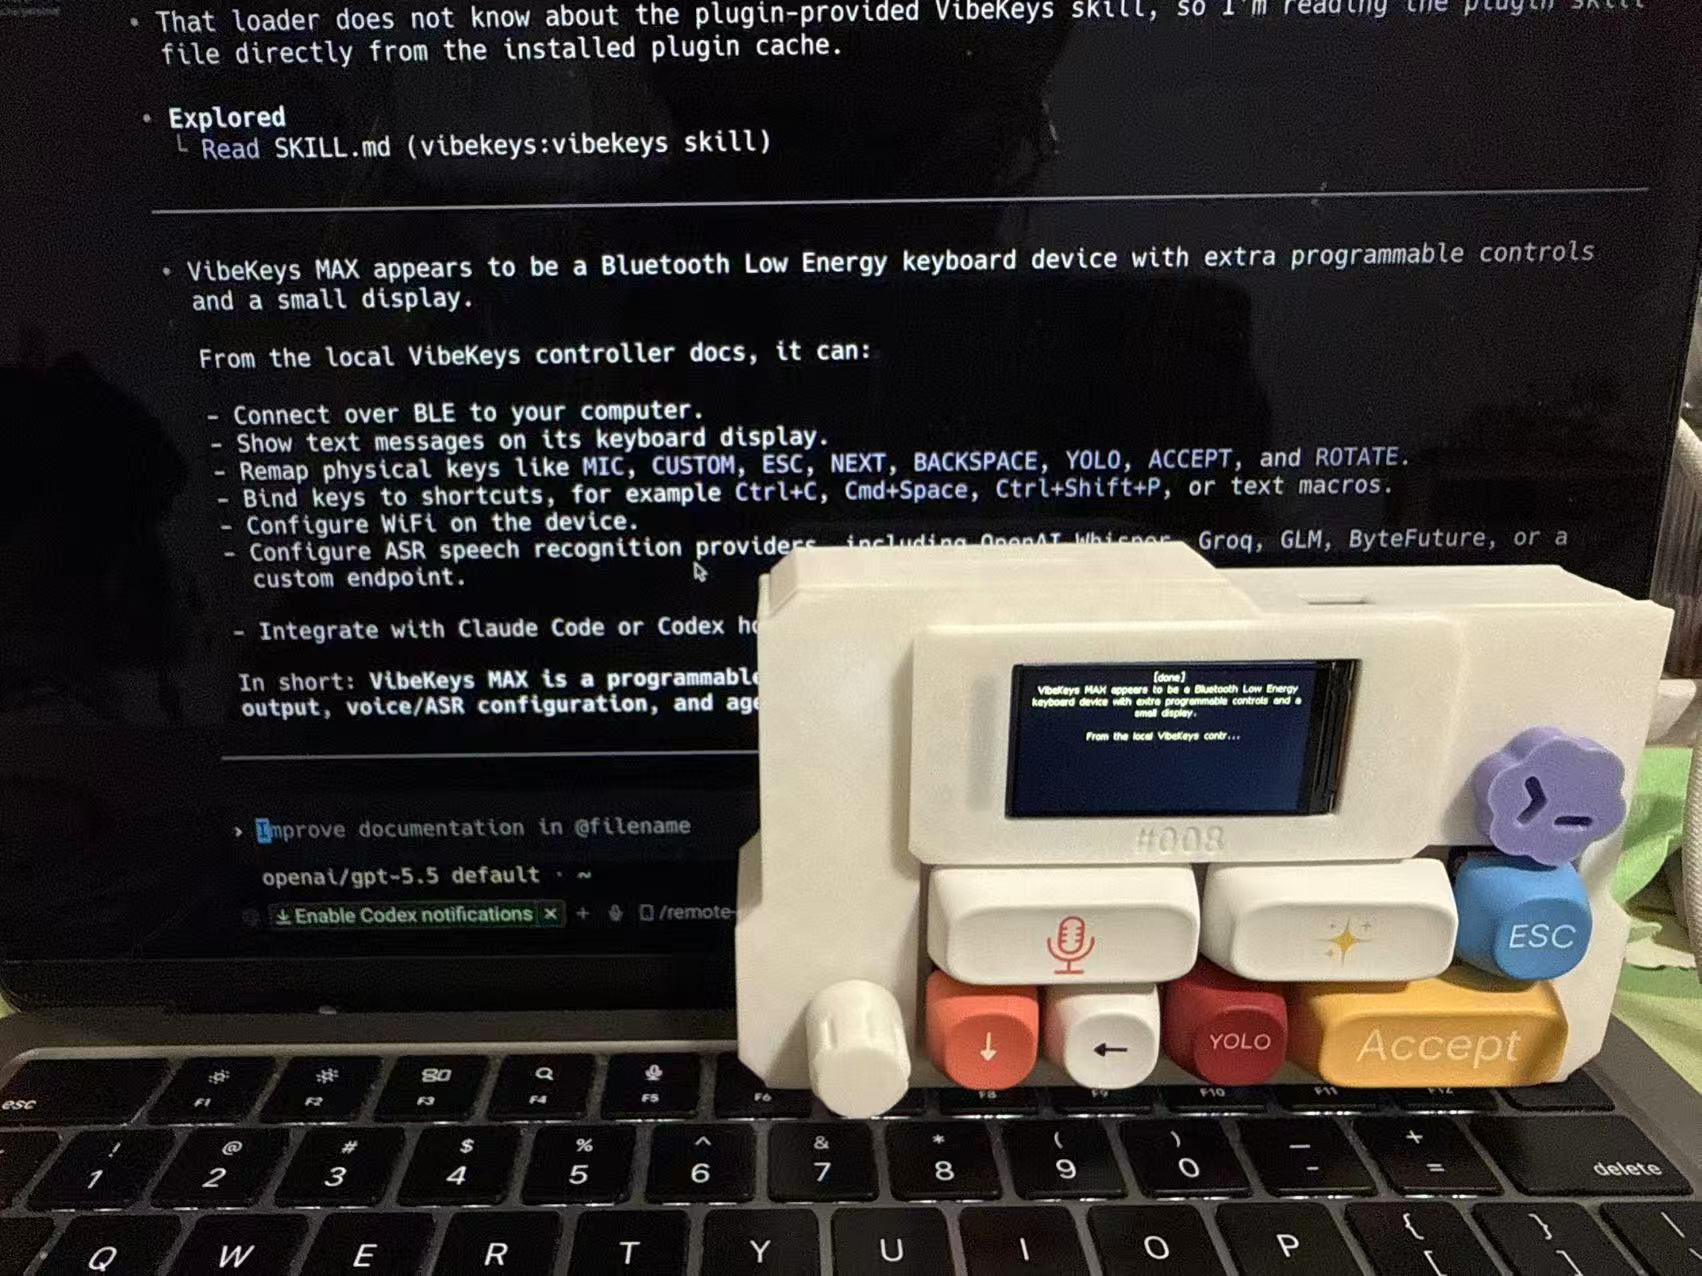
        <content type="html"><![CDATA[<p><a href="https://9to5mac.com/2026/06/29/openai-teases-codex-branded-hardware-collaboration-coming-heres-what-to-expect/" target="_blank" rel="noopener noreferrer" class="">OpenAI just announced a keyboard for Codex</a> — physical controls for coding agents are clearly having a moment. Good timing: <a href="https://vibekeys.dev/vibekeys-max.html" target="_blank" rel="noopener noreferrer" class="">VibeKeys Max</a> now works with Codex too, and the same keypad already handles Claude Code and whatever you reach for next.</p>
<p><img decoding="async" loading="lazy" alt="VibeKeys Max set up for OpenAI Codex" src="https://vibekeys.dev/assets/images/codex-f1d906a44f58f1cdfb2343297d53d649.jpg" width="1702" height="1276" class="img_ev3q"></p>
<p>You know the loop: Codex proposes a change and waits, so you reach over and type <code>y</code>. Again. Again. Your sharpest coding tool, and you've turned into a human Enter key. Now <code>y</code> is a keycap you tap, <code>/review</code> is one press, and switching your keypad between Codex and Claude Code is a single command.</p>
<h2 class="anchor anchorTargetStickyNavbar_Vzrq" id="set-it-up-in-keyboard-mode">Set it up in keyboard mode<a href="https://vibekeys.dev/blog/vibekeys-codex-profiles/#set-it-up-in-keyboard-mode" class="hash-link" aria-label="Direct link to Set it up in keyboard mode" title="Direct link to Set it up in keyboard mode" translate="no">​</a></h2>
<p>Grab the latest <a href="https://github.com/second-state/vibekeys_app/releases" target="_blank" rel="noopener noreferrer" class=""><code>vibekeys</code> CLI</a> (profiles need <strong>v0.1.9+</strong>), pair VibeKeys Max over Bluetooth, and run one command:</p>
<div class="language-bash codeBlockContainer_Ckt0 theme-code-block" style="--prism-color:#bfc7d5;--prism-background-color:#292d3e"><div class="codeBlockContent_QJqH"><pre tabindex="0" class="prism-code language-bash codeBlock_bY9V thin-scrollbar" style="color:#bfc7d5;background-color:#292d3e"><code class="codeBlockLines_e6Vv"><span class="token-line" style="color:#bfc7d5"><span class="token plain">$ vibekeys profile codex</span><br></span><span class="token-line" style="color:#bfc7d5"><span class="token plain">✨ You're with Codex now</span><br></span></code></pre></div></div>
<p>That's the whole setup. Now <code>CUSTOM</code> fires <code>/review</code> and <code>YOLO</code> sends <code>y</code> — tap to review, tap to approve, eyes on the diff and hands off the home row. Jump back to Claude Code and <code>vibekeys profile claude</code> puts the keys back. Only those two ever change; your mic, knob, and everything else stay put.</p>
<p>Want Codex's live status on the keypad screen too? Install the plugin — <a class="" href="https://vibekeys.dev/docs/codex-status/">Codex Status Integration</a>.</p>
<h2 class="anchor anchorTargetStickyNavbar_Vzrq" id="or-run-it-wireless">Or run it wireless<a href="https://vibekeys.dev/blog/vibekeys-codex-profiles/#or-run-it-wireless" class="hash-link" aria-label="Direct link to Or run it wireless" title="Direct link to Or run it wireless" translate="no">​</a></h2>
<p>Prefer to drive Codex from the couch? VibeKeys Max talks to your machine over Wi-Fi through <a href="https://github.com/second-state/vibetty" target="_blank" rel="noopener noreferrer" class="">vibetty</a>:</p>
<div class="language-bash codeBlockContainer_Ckt0 theme-code-block" style="--prism-color:#bfc7d5;--prism-background-color:#292d3e"><div class="codeBlockContent_QJqH"><pre tabindex="0" class="prism-code language-bash codeBlock_bY9V thin-scrollbar" style="color:#bfc7d5;background-color:#292d3e"><code class="codeBlockLines_e6Vv"><span class="token-line" style="color:#bfc7d5"><span class="token plain">vibetty -- codex</span><br></span></code></pre></div></div>
<p>Pair the device at <a href="https://vibekeys.dev/setup.html" target="_blank" rel="noopener noreferrer" class="">vibekeys.dev/setup.html</a> and steer the whole session — approve, scroll, speak — from across the room. Full steps: <a class="" href="https://vibekeys.dev/docs/remote-mode/">Remote Control Mode</a>.</p>
<h2 class="anchor anchorTargetStickyNavbar_Vzrq" id="why-codex-specifically">Why Codex, specifically<a href="https://vibekeys.dev/blog/vibekeys-codex-profiles/#why-codex-specifically" class="hash-link" aria-label="Direct link to Why Codex, specifically" title="Direct link to Why Codex, specifically" translate="no">​</a></h2>
<p>Codex runs the same loop all day: prompt, review, approve, repeat. Those repeats are exactly what a dedicated key is for. Profiles just make sure each key means the right thing for the tool you're in — so one keypad covers Codex and <a href="https://vibekeys.dev/claude-code-keyboard.html" target="_blank" rel="noopener noreferrer" class="">Claude Code</a>, with no remapping by hand.</p>
<hr>
<p>Already have a VibeKeys Max? Update the CLI to v0.1.9+ and run <code>vibekeys profile codex</code>. If you don't, <a href="https://vibekeys.dev/codex-keyboard.html" target="_blank" rel="noopener noreferrer" class="">grab one</a>.</p>]]></content>
        <author>
            <name>VibeKeys Team</name>
            <uri>https://vibekeys.dev</uri>
        </author>
        <category label="codex" term="codex"/>
        <category label="claude-code" term="claude-code"/>
        <category label="product-update" term="product-update"/>
        <category label="remote-control" term="remote-control"/>
        <category label="keyboard" term="keyboard"/>
    </entry>
    <entry>
        <title type="html"><![CDATA[OpenAI Announced a Codex Keyboard. Here's How We Think About It.]]></title>
        <id>https://vibekeys.dev/blog/openai-codex-keyboard-vs-vibekeys/</id>
        <link href="https://vibekeys.dev/blog/openai-codex-keyboard-vs-vibekeys/"/>
        <updated>2026-06-30T00:00:00.000Z</updated>
        <summary type="html"><![CDATA[OpenAI is making a Codex coding keyboard with Work Louder. Our take: it validates the category — but it's locked to one AI vendor. Here's how VibeKeys compares.]]></summary>
        <content type="html"><![CDATA[<p>OpenAI just announced a coding keyboard, built with Work Louder and customized for Codex. As a team that's been shipping a keypad for AI coding for a while now, we have thoughts — and honestly, the first one is: <strong>this is good news.</strong></p>
<h2 class="anchor anchorTargetStickyNavbar_Vzrq" id="a-big-player-validating-the-category">A big player validating the category<a href="https://vibekeys.dev/blog/openai-codex-keyboard-vs-vibekeys/#a-big-player-validating-the-category" class="hash-link" aria-label="Direct link to A big player validating the category" title="Direct link to A big player validating the category" translate="no">​</a></h2>
<p>For a long time, the idea of a dedicated keyboard for AI coding got the same reaction: "Do you really need that?" When OpenAI ships hardware for exactly this, that question answers itself. The AI coding loop — accept, retry, steer, voice, navigate — is real enough that it deserves its own physical controls. We've believed that since day one, so we're glad to see it.</p>
<h2 class="anchor anchorTargetStickyNavbar_Vzrq" id="what-was-announced">What was announced<a href="https://vibekeys.dev/blog/openai-codex-keyboard-vs-vibekeys/#what-was-announced" class="hash-link" aria-label="Direct link to What was announced" title="Direct link to What was announced" translate="no">​</a></h2>
<p>The OpenAI × Work Louder board is based on Work Louder's Creator Micro 2 macropad, with Codex-specific customization: 13 keys, a knob, a joystick with an on-screen radial menu, touch sensors, RGB lighting, and six configurable layers. It's a capable, power-user macropad.</p>
<p>Two things stand out, though: it's <strong>customized for Codex</strong>, and at the time of writing it's an <strong>announcement</strong> — pricing and ship date haven't been finalized. (The Creator Micro 2 it's based on starts at $144.)</p>
<h2 class="anchor anchorTargetStickyNavbar_Vzrq" id="the-one-difference-that-matters-most">The one difference that matters most<a href="https://vibekeys.dev/blog/openai-codex-keyboard-vs-vibekeys/#the-one-difference-that-matters-most" class="hash-link" aria-label="Direct link to The one difference that matters most" title="Direct link to The one difference that matters most" translate="no">​</a></h2>
<p>We built VibeKeys with a deliberate choice: <strong>don't lock it to a single AI vendor.</strong></p>
<p>Most developers don't live in one tool. You might run Claude Code today, Cursor tomorrow, Codex for one project, Gemini CLI for a quick task. A keyboard customized for one ecosystem ties your hardware to one company's roadmap. VibeKeys remaps to whatever you're using — Claude Code, Cursor, Codex, Gemini CLI, OpenCode, Copilot — so it doesn't become obsolete the day you switch tools.</p>
<h2 class="anchor anchorTargetStickyNavbar_Vzrq" id="a-few-other-things-a-codex-macropad-cant-do">A few other things a Codex macropad can't do<a href="https://vibekeys.dev/blog/openai-codex-keyboard-vs-vibekeys/#a-few-other-things-a-codex-macropad-cant-do" class="hash-link" aria-label="Direct link to A few other things a Codex macropad can't do" title="Direct link to A few other things a Codex macropad can't do" translate="no">​</a></h2>
<ul>
<li class=""><strong>Voice-first input</strong> — a dedicated mic key for dictating to your agent hands-free.</li>
<li class=""><strong>Control from across the room</strong> — VibeKeys Max drives your agent wirelessly via the open-source vibetty server, with an OLED screen showing live status. A wired desktop macropad stays at the desk.</li>
<li class=""><strong>On your desk this week</strong> — VibeKeys ships today, from $29, with free worldwide shipping. Not a waitlist.</li>
<li class=""><strong>Made yours</strong> — 3D-printed to order in a range of colors, with custom key icons.</li>
</ul>
<h2 class="anchor anchorTargetStickyNavbar_Vzrq" id="who-each-one-is-for">Who each one is for<a href="https://vibekeys.dev/blog/openai-codex-keyboard-vs-vibekeys/#who-each-one-is-for" class="hash-link" aria-label="Direct link to Who each one is for" title="Direct link to Who each one is for" translate="no">​</a></h2>
<p>If Codex is your single, primary tool and you want the most keys, layers, and RGB you can get, the OpenAI board will be a great fit when it ships.</p>
<p>If you use more than one AI tool, want voice and away-from-desk control, and want something affordable that's available right now — that's VibeKeys.</p>
<p>We put together a full, honest side-by-side here: <strong><a href="https://vibekeys.dev/vibekeys-vs-openai-codex-keyboard.html" target="_blank" rel="noopener noreferrer" class="">VibeKeys vs OpenAI's Codex Keyboard</a></strong>.</p>
<p>Either way, the era of physical controls for AI coding is clearly here. We're just glad more people get to feel what it's like — and if you don't want to wait, <a href="https://vibekeys.dev/vibekeys-max.html" target="_blank" rel="noopener noreferrer" class="">VibeKeys is shipping today</a>.</p>]]></content>
        <author>
            <name>VibeKeys Team</name>
            <uri>https://vibekeys.dev</uri>
        </author>
        <category label="vibe-coding" term="vibe-coding"/>
        <category label="ai-coding" term="ai-coding"/>
        <category label="codex" term="codex"/>
        <category label="openai" term="openai"/>
        <category label="hardware" term="hardware"/>
    </entry>
    <entry>
        <title type="html"><![CDATA[Vibetty Now Runs on Windows]]></title>
        <id>https://vibekeys.dev/blog/vibetty-windows-support/</id>
        <link href="https://vibekeys.dev/blog/vibetty-windows-support/"/>
        <updated>2026-06-24T00:00:00.000Z</updated>
        <summary type="html"><![CDATA[Vibetty, the voice-enabled WebSocket terminal for AI coding agents, now supports Windows 10 and 11 through ConPTY.]]></summary>
        <content type="html"><![CDATA[<p><a href="https://github.com/second-state/vibetty" target="_blank" rel="noopener noreferrer" class="">Vibetty</a> is a voice-driven terminal for AI coding agents. You speak into a VibeKeys Max keyboard's built-in microphone, the keyboard streams the audio to the Vibetty server, and your words are transcribed straight into Claude Code (or any terminal program) while the live terminal shows in your browser. Until now it ran on Linux and macOS only. As of this release, <strong>Vibetty runs on Windows 10 and 11 too.</strong></p>
<h2 class="anchor anchorTargetStickyNavbar_Vzrq" id="what-changed">What changed<a href="https://vibekeys.dev/blog/vibetty-windows-support/#what-changed" class="hash-link" aria-label="Direct link to What changed" title="Direct link to What changed" translate="no">​</a></h2>
<p>The hard part of running a terminal app on Windows is the pseudo-terminal (PTY). On Linux and macOS, Vibetty uses a Unix PTY to spawn and talk to the shell. Windows has its own mechanism, <strong>ConPTY</strong>, and getting it right took two fixes:</p>
<ul>
<li class=""><strong>PTY backend.</strong> Vibetty now uses <a href="https://crates.io/crates/portable-pty-psmux" target="_blank" rel="noopener noreferrer" class=""><code>portable-pty-psmux</code></a>, an API-compatible fork of <code>portable-pty</code>. The published <code>portable-pty</code> 0.9.0 has a known ConPTY bug (<a href="https://github.com/wez/wezterm/issues/1396" target="_blank" rel="noopener noreferrer" class="">wezterm#1396</a>) where the spawned process produces no output and ignores input. The fork ships the upstream fix that was never published to crates.io.</li>
<li class=""><strong>Cursor-position report.</strong> Windows ConPTY sends an <code>ESC[6n</code> (cursor position request) on startup and stalls until the host replies. Unix shells don't do this, so macOS was never affected. Vibetty's reader thread now answers with <code>ESC[1;1R</code> on the first read, so <code>cmd</code>, PowerShell, and <code>claude</code> start cleanly.</li>
</ul>
<h2 class="anchor anchorTargetStickyNavbar_Vzrq" id="running-on-windows">Running on Windows<a href="https://vibekeys.dev/blog/vibetty-windows-support/#running-on-windows" class="hash-link" aria-label="Direct link to Running on Windows" title="Direct link to Running on Windows" translate="no">​</a></h2>
<p>Pre-built releases now include a <code>vibetty-windows-x64.exe</code> binary. From PowerShell or Command Prompt:</p>
<div class="language-powershell codeBlockContainer_Ckt0 theme-code-block" style="--prism-color:#bfc7d5;--prism-background-color:#292d3e"><div class="codeBlockContent_QJqH"><pre tabindex="0" class="prism-code language-powershell codeBlock_bY9V thin-scrollbar" style="color:#bfc7d5;background-color:#292d3e"><code class="codeBlockLines_e6Vv"><span class="token-line" style="color:#bfc7d5"><span class="token plain"># Pre-built binary</span><br></span><span class="token-line" style="color:#bfc7d5"><span class="token plain">.\vibetty-windows-x64.exe -- claude</span><br></span><span class="token-line" style="color:#bfc7d5"><span class="token plain" style="display:inline-block"></span><br></span><span class="token-line" style="color:#bfc7d5"><span class="token plain"># Or build from source</span><br></span><span class="token-line" style="color:#bfc7d5"><span class="token plain">cargo build --release</span><br></span><span class="token-line" style="color:#bfc7d5"><span class="token plain">.\target\release\vibetty.exe -- claude</span><br></span></code></pre></div></div>
<p>Set your ASR config with <code>$env:</code> in PowerShell:</p>
<div class="language-powershell codeBlockContainer_Ckt0 theme-code-block" style="--prism-color:#bfc7d5;--prism-background-color:#292d3e"><div class="codeBlockContent_QJqH"><pre tabindex="0" class="prism-code language-powershell codeBlock_bY9V thin-scrollbar" style="color:#bfc7d5;background-color:#292d3e"><code class="codeBlockLines_e6Vv"><span class="token-line" style="color:#bfc7d5"><span class="token plain">$env:VIBECODE_ASR_API_KEY = "your_api_key_here"</span><br></span><span class="token-line" style="color:#bfc7d5"><span class="token plain">$env:VIBECODE_ASR_URL     = "https://api.groq.com/openai/v1/audio/transcriptions"</span><br></span><span class="token-line" style="color:#bfc7d5"><span class="token plain">.\vibetty.exe -- claude</span><br></span></code></pre></div></div>
<p>Then open <code>http://localhost:3000</code> and start talking to your agent. The full setup, including the interactive <code>vibetty setup</code> wizard and the browser-side WebVosk mode that needs no API key, is in the <a href="https://github.com/second-state/vibetty#readme" target="_blank" rel="noopener noreferrer" class="">README</a>.</p>
<h2 class="anchor anchorTargetStickyNavbar_Vzrq" id="why-it-matters">Why it matters<a href="https://vibekeys.dev/blog/vibetty-windows-support/#why-it-matters" class="hash-link" aria-label="Direct link to Why it matters" title="Direct link to Why it matters" translate="no">​</a></h2>
<p>Voice-driven AI coding shouldn't depend on your operating system. With Windows support, the same Vibetty workflow now works the same way across Linux, macOS, and Windows, so you can speak to Claude Code from whatever machine you're on.</p>]]></content>
        <author>
            <name>VibeKeys Team</name>
            <uri>https://vibekeys.dev</uri>
        </author>
        <category label="vibetty" term="vibetty"/>
        <category label="claude-code" term="claude-code"/>
        <category label="voice" term="voice"/>
        <category label="terminal" term="terminal"/>
        <category label="windows" term="windows"/>
    </entry>
    <entry>
        <title type="html"><![CDATA[What Is a Vibe Coding Keyboard?]]></title>
        <id>https://vibekeys.dev/blog/what-is-a-vibe-coding-keyboard/</id>
        <link href="https://vibekeys.dev/blog/what-is-a-vibe-coding-keyboard/"/>
        <updated>2026-06-19T00:00:00.000Z</updated>
        <summary type="html"><![CDATA[A practical guide to vibe coding keyboards: what they are, how they differ from macro pads, and why AI coding workflows benefit from physical controls.]]></summary>
        <content type="html"><![CDATA[<p>A vibe coding keyboard is a physical keyboard, keypad, or control surface designed for AI-assisted coding workflows. Instead of treating Claude Code, Cursor, Codex, Gemini CLI, OpenCode, and other coding agents like normal software apps, it gives the agent loop its own dedicated controls.</p>
<p>The idea is simple: when a developer works with an AI coding agent such as Claude Code or Codex, a small set of actions happens again and again. Accept a change. Reject an answer. Retry a prompt. Continue a task. Compact the context. Scroll through a long diff. Toggle voice input. Switch modes. A vibe coding keyboard puts those actions under physical keys, knobs, and sometimes a status screen.</p>
<h2 class="anchor anchorTargetStickyNavbar_Vzrq" id="why-ai-coding-needs-a-different-interface">Why AI coding needs a different interface<a href="https://vibekeys.dev/blog/what-is-a-vibe-coding-keyboard/#why-ai-coding-needs-a-different-interface" class="hash-link" aria-label="Direct link to Why AI coding needs a different interface" title="Direct link to Why AI coding needs a different interface" translate="no">​</a></h2>
<p>Traditional keyboards were built around typing. Editors added shortcuts for saving files, jumping between panes, running commands, and navigating code. That worked well when the developer was doing most of the direct editing.</p>
<p>AI coding changes the rhythm. The developer is still responsible for direction, judgment, review, and taste, but the interaction becomes more conversational and iterative. You ask the agent to make a change, review the output, approve or reject it, ask for a revision, and keep steering.</p>
<p>That loop is different from typing code line by line. It is closer to operating a second pair-programmer that moves quickly but needs frequent direction. A physical interface helps because the repeated decisions become tactile instead of buried in shortcuts, terminal prompts, or mouse clicks.</p>
<h2 class="anchor anchorTargetStickyNavbar_Vzrq" id="what-a-vibe-coding-keyboard-usually-controls">What a vibe coding keyboard usually controls<a href="https://vibekeys.dev/blog/what-is-a-vibe-coding-keyboard/#what-a-vibe-coding-keyboard-usually-controls" class="hash-link" aria-label="Direct link to What a vibe coding keyboard usually controls" title="Direct link to What a vibe coding keyboard usually controls" translate="no">​</a></h2>
<p>A useful AI coding keyboard is not just "more buttons." The best layouts are built around the actions developers repeat during agentic coding:</p>
<ul>
<li class=""><strong>Accept</strong>: approve a suggestion, diff, or generated change</li>
<li class=""><strong>Reject or Escape</strong>: stop the current path and regain control</li>
<li class=""><strong>Retry</strong>: ask the agent to try again or revise an answer</li>
<li class=""><strong>Continue</strong>: move a task forward without retyping the same instruction</li>
<li class=""><strong>Compact</strong>: summarize or compact a long agent session so the context stays manageable</li>
<li class=""><strong>YOLO or high-trust mode</strong>: make an explicit mode shift when you want the agent to act more freely</li>
<li class=""><strong>Voice input</strong>: speak a prompt or longer instruction without reaching for a separate shortcut</li>
<li class=""><strong>Scroll and navigation</strong>: move through long responses, diffs, files, and menus with a knob</li>
<li class=""><strong>Status</strong>: see what the agent is doing without switching windows</li>
</ul>
<p>That last point matters more as sessions get longer. When your agent is planning, generating, waiting, or blocked, a quick glance at a status screen can be less disruptive than hunting through terminal output.</p>
<h2 class="anchor anchorTargetStickyNavbar_Vzrq" id="how-it-differs-from-a-macro-pad-or-stream-deck">How it differs from a macro pad or Stream Deck<a href="https://vibekeys.dev/blog/what-is-a-vibe-coding-keyboard/#how-it-differs-from-a-macro-pad-or-stream-deck" class="hash-link" aria-label="Direct link to How it differs from a macro pad or Stream Deck" title="Direct link to How it differs from a macro pad or Stream Deck" translate="no">​</a></h2>
<p>A macro pad can send shortcuts. A Stream Deck can launch commands and show visual buttons. Both can be useful, but they start from a general-purpose automation model: you decide what every button means.</p>
<p>A vibe coding keyboard starts from the AI coding loop itself. The physical layout, labels, and defaults are designed around agent control, not generic app shortcuts. That makes it easier to understand and easier to hand to someone who already uses Claude Code, Cursor, Codex, or another coding agent.</p>
<p>The difference is not that a macro pad cannot do some of the same things. It can. The difference is that an AI coding keyboard is opinionated about the workflow from the beginning.</p>
<h2 class="anchor anchorTargetStickyNavbar_Vzrq" id="why-physical-controls-help">Why physical controls help<a href="https://vibekeys.dev/blog/what-is-a-vibe-coding-keyboard/#why-physical-controls-help" class="hash-link" aria-label="Direct link to Why physical controls help" title="Direct link to Why physical controls help" translate="no">​</a></h2>
<p>Physical controls are useful when an action is frequent, time-sensitive, or easy to confuse with another action. AI coding has all three.</p>
<p>Accepting a change should feel different from rejecting it. Entering a high-trust mode should be deliberate. Starting voice input should be easy enough that you actually use it. Scrolling through a long agent response should not break your concentration.</p>
<p>That is where tactile controls earn their place. A dedicated key is faster than remembering a shortcut. A knob is more natural for long output than repeated key presses. A clearly labeled mode key reduces the chance of sending the wrong command at the wrong moment. For commands like <code>/compact</code> in Claude Code or similar context-management actions in Codex-style workflows, a physical key also makes the maintenance step harder to forget.</p>
<h2 class="anchor anchorTargetStickyNavbar_Vzrq" id="is-it-a-full-keyboard-or-a-keypad">Is it a full keyboard or a keypad?<a href="https://vibekeys.dev/blog/what-is-a-vibe-coding-keyboard/#is-it-a-full-keyboard-or-a-keypad" class="hash-link" aria-label="Direct link to Is it a full keyboard or a keypad?" title="Direct link to Is it a full keyboard or a keypad?" translate="no">​</a></h2>
<p>It can be either. Some developers want a compact AI coding keypad that sits beside their normal keyboard. Others want a larger keyboard-style control surface that includes more room for status, voice, navigation, and custom labels.</p>
<p>For most people, the important question is not whether it replaces the main keyboard. It usually should not. The better question is whether it gives your AI coding workflow a dedicated physical layer.</p>
<p>That is why VibeKeys has multiple models:</p>
<ul>
<li class=""><a href="https://vibekeys.dev/vibekeys-pro.html" target="_blank" rel="noopener noreferrer" class="">VibeKeys Pro</a>: a compact wired AI coding keypad with six programmable keys and a knob</li>
<li class=""><a href="https://vibekeys.dev/vibekeys-plus.html" target="_blank" rel="noopener noreferrer" class="">VibeKeys Plus</a>: the same compact idea with Bluetooth, Wi-Fi, and longer desk flexibility</li>
<li class=""><a href="https://vibekeys.dev/vibekeys-max.html" target="_blank" rel="noopener noreferrer" class="">VibeKeys Max</a>: a larger AI coding console with a status screen, built-in mic, remote mode, open-source firmware, and custom printed case options</li>
</ul>
<p>If you want the broader category overview, start with the <a href="https://vibekeys.dev/vibe-coding-keyboard.html" target="_blank" rel="noopener noreferrer" class="">physical vibe coding keyboard guide</a>.</p>
<h2 class="anchor anchorTargetStickyNavbar_Vzrq" id="who-should-use-one">Who should use one?<a href="https://vibekeys.dev/blog/what-is-a-vibe-coding-keyboard/#who-should-use-one" class="hash-link" aria-label="Direct link to Who should use one?" title="Direct link to Who should use one?" translate="no">​</a></h2>
<p>A vibe coding keyboard is most useful for developers who already spend real time with AI coding agents. If you only ask an assistant an occasional question, normal shortcuts are probably enough.</p>
<p>It starts to make sense when the agent is part of your daily loop:</p>
<ul>
<li class="">You review generated diffs throughout the day</li>
<li class="">You frequently accept, reject, retry, or continue agent output</li>
<li class="">You use voice input to describe bugs, architecture, or product behavior</li>
<li class="">You work in long Claude Code, Cursor, Codex, Gemini CLI, or OpenCode sessions</li>
<li class="">You want a clearer boundary between normal typing and agent control</li>
</ul>
<p>It is also a practical gift for engineering teams that are adopting AI coding. Unlike generic swag, it maps to a workflow developers are already trying to improve.</p>
<h2 class="anchor anchorTargetStickyNavbar_Vzrq" id="the-category-is-still-early">The category is still early<a href="https://vibekeys.dev/blog/what-is-a-vibe-coding-keyboard/#the-category-is-still-early" class="hash-link" aria-label="Direct link to The category is still early" title="Direct link to The category is still early" translate="no">​</a></h2>
<p>"Vibe coding keyboard" is a new phrase because the workflow is new. Developers are still figuring out which controls deserve hardware and which actions are better left as software.</p>
<p>That is a good reason to keep the design focused. The goal is not to put every possible command on a desk device. The goal is to make the repeated AI coding loop faster, clearer, and more deliberate.</p>
<p>If your agent is becoming a daily collaborator, it may deserve more than a hidden shortcut. It may deserve a physical interface.</p>
<p>Ready to try one? Compare the current VibeKeys models on the <a href="https://vibekeys.dev/vibe-coding-keyboard.html" target="_blank" rel="noopener noreferrer" class="">vibe coding keyboard landing page</a>, or go straight to <a href="https://vibekeys.dev/vibekeys-max.html" target="_blank" rel="noopener noreferrer" class="">VibeKeys Max</a>.</p>]]></content>
        <author>
            <name>VibeKeys Team</name>
            <uri>https://vibekeys.dev</uri>
        </author>
        <category label="vibe-coding" term="vibe-coding"/>
        <category label="ai-coding" term="ai-coding"/>
        <category label="claude-code" term="claude-code"/>
        <category label="hardware" term="hardware"/>
    </entry>
    <entry>
        <title type="html"><![CDATA[Everyone's AI Imagined a Vibe Coding Keyboard. We Actually Built One.]]></title>
        <id>https://vibekeys.dev/blog/vibe-coding-keyboard-ai-imagined-we-built-it/</id>
        <link href="https://vibekeys.dev/blog/vibe-coding-keyboard-ai-imagined-we-built-it/"/>
        <updated>2026-06-17T00:00:00.000Z</updated>
        <summary type="html"><![CDATA[AI keeps dreaming up the perfect vibe coding keyboard in viral concept renders. We built the real one: VibeKeys Max, with a status screen, mic, knob, and YOLO key.]]></summary>
        <content type="html"><![CDATA[<p>Open X on any given week in 2026 and you'll see it: another stunning render of "the vibe coding keyboard." A physical keypad with <strong>Allow Once</strong>, <strong>Always Allow</strong>, and <strong>Reject</strong> keys. A little status screen showing what your agent is doing. A YOLO button. Maybe a knob to switch models.</p>
<p>They're beautiful. They rack up thousands of likes. And almost every one of them is a concept render — something that looks incredible in a screenshot but that you can't actually order.</p>
<p>We kept seeing them, and honestly, we love them. We also kept thinking the same thing: <em>someone should actually build this.</em> So we did.</p>
<h2 class="anchor anchorTargetStickyNavbar_Vzrq" id="the-vibe-coding-keyboard-the-community-keeps-dreaming-up">The vibe coding keyboard the community keeps dreaming up<a href="https://vibekeys.dev/blog/vibe-coding-keyboard-ai-imagined-we-built-it/#the-vibe-coding-keyboard-the-community-keeps-dreaming-up" class="hash-link" aria-label="Direct link to The vibe coding keyboard the community keeps dreaming up" title="Direct link to The vibe coding keyboard the community keeps dreaming up" translate="no">​</a></h2>
<p>This concept has become its own micro-genre. Developers and designers keep imagining the same device over and over, each with their own spin, and the renders are genuinely great.</p>
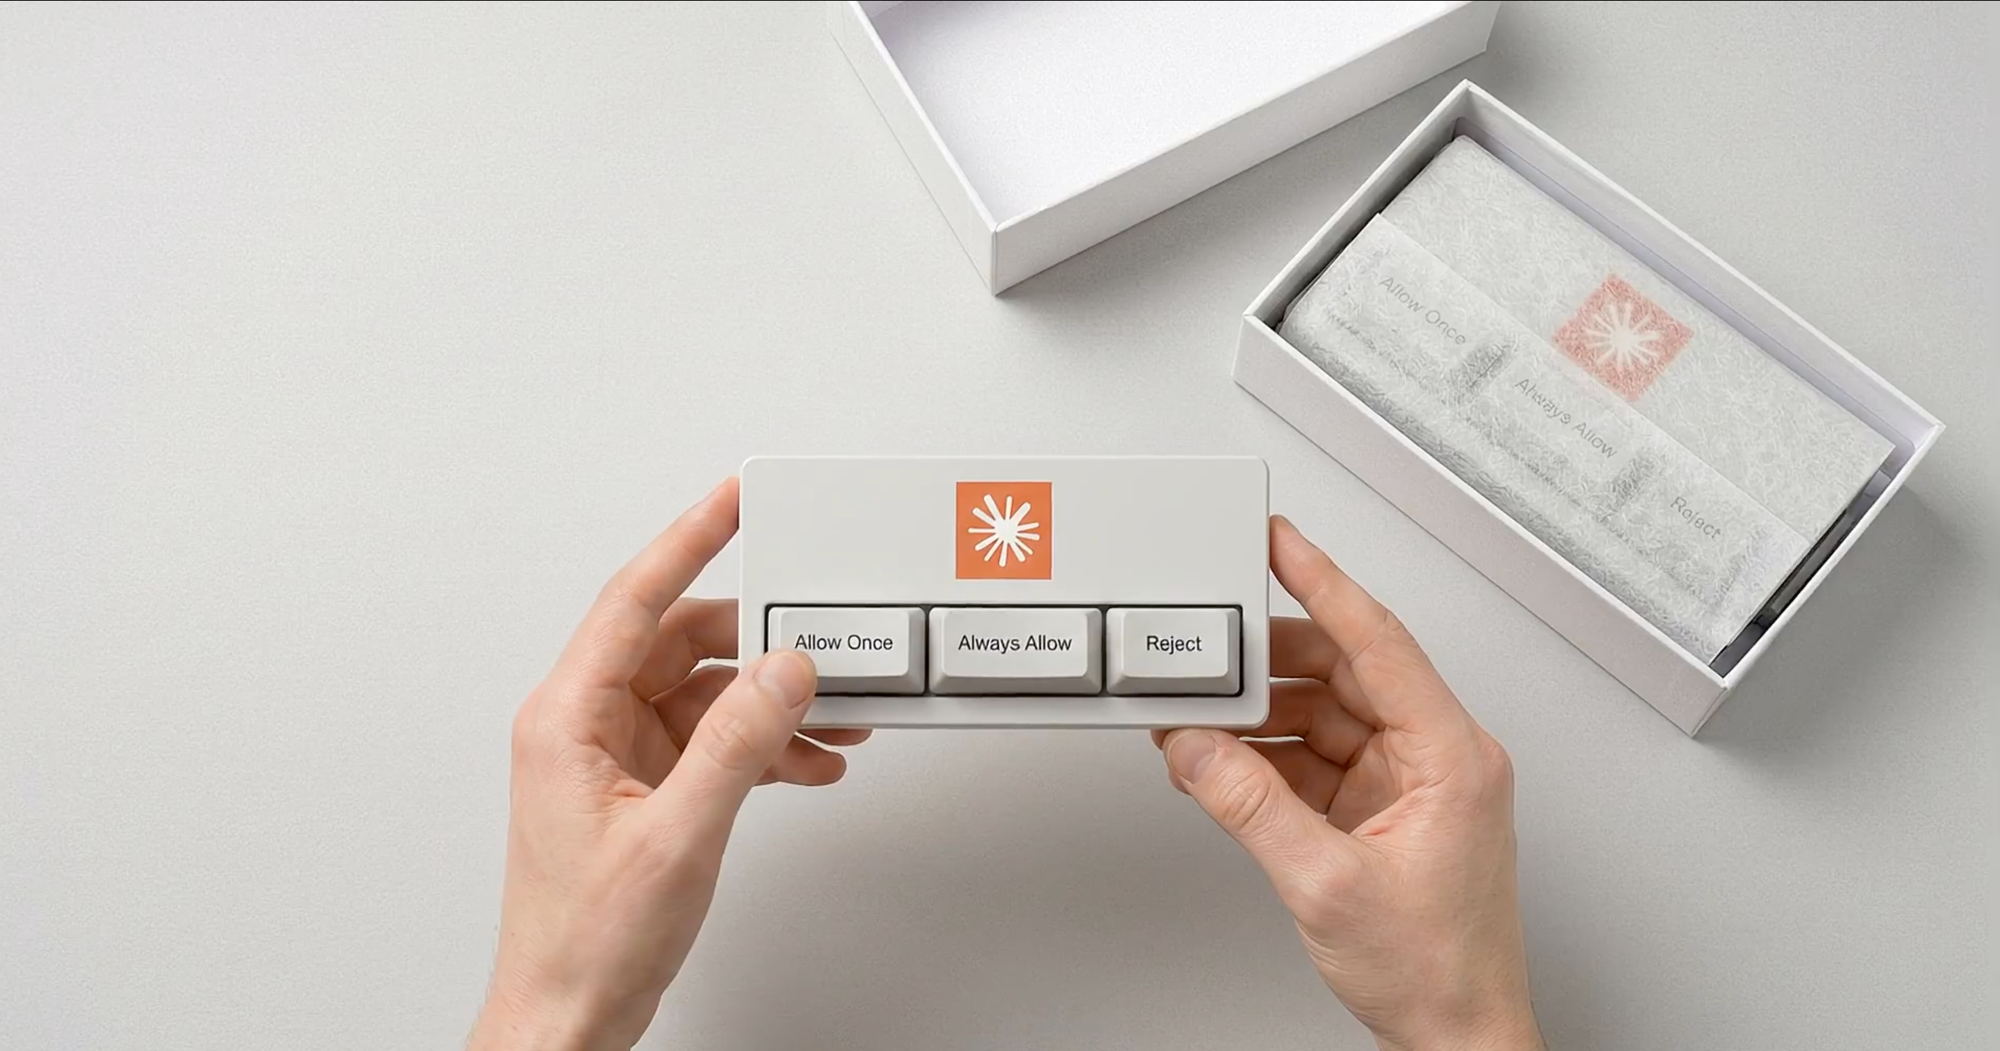
<p>There's <a href="https://x.com/fabianstelzer/status/2041854059741679666" target="_blank" rel="noopener noreferrer" class="">@fabianstelzer</a>'s clean three-key version, packaged like a luxury product:</p>
<p><img decoding="async" loading="lazy" alt="Concept render of a white keypad with Allow Once, Always Allow, and Reject keys in a premium box" src="https://vibekeys.dev/assets/images/ai-concept-anthropic-keypad-box-fabbfa595365c351fcc7c5ace7b54ebe.png" width="2000" height="1051" class="img_ev3q"></p>
<p><em>Concept by <a href="https://x.com/fabianstelzer/status/2041854059741679666" target="_blank" rel="noopener noreferrer" class="">@fabianstelzer</a>. Not affiliated with or endorsed by Anthropic.</em></p>
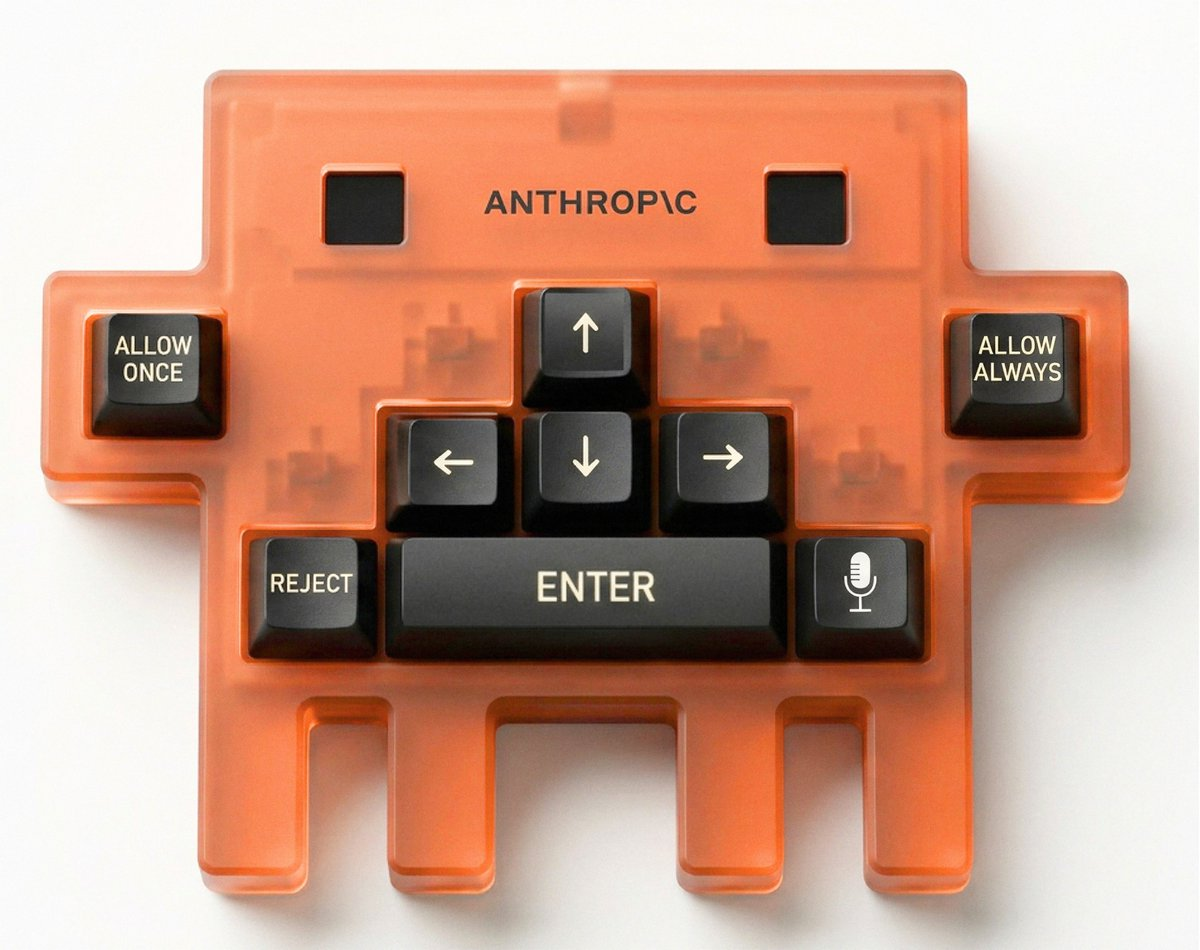
<p>There's <a href="https://x.com/Salmaaboukarr/status/2038041934007095360" target="_blank" rel="noopener noreferrer" class="">@Salmaaboukarr</a>'s playful translucent-orange "space invader" build, complete with arrow keys, an ENTER bar, and even a microphone key:</p>
<p><img decoding="async" loading="lazy" alt="Concept render of a translucent orange keypad shaped like a space invader, with arrow keys, Enter, Reject, Allow Once, Allow Always, and a mic key" src="https://vibekeys.dev/assets/images/ai-concept-orange-space-invader-bfbf9f18294808c40550616749f5bc7c.png" width="1200" height="950" class="img_ev3q"></p>
<p><em>Concept by <a href="https://x.com/Salmaaboukarr/status/2038041934007095360" target="_blank" rel="noopener noreferrer" class="">@Salmaaboukarr</a>. Not affiliated with or endorsed by Anthropic.</em></p>
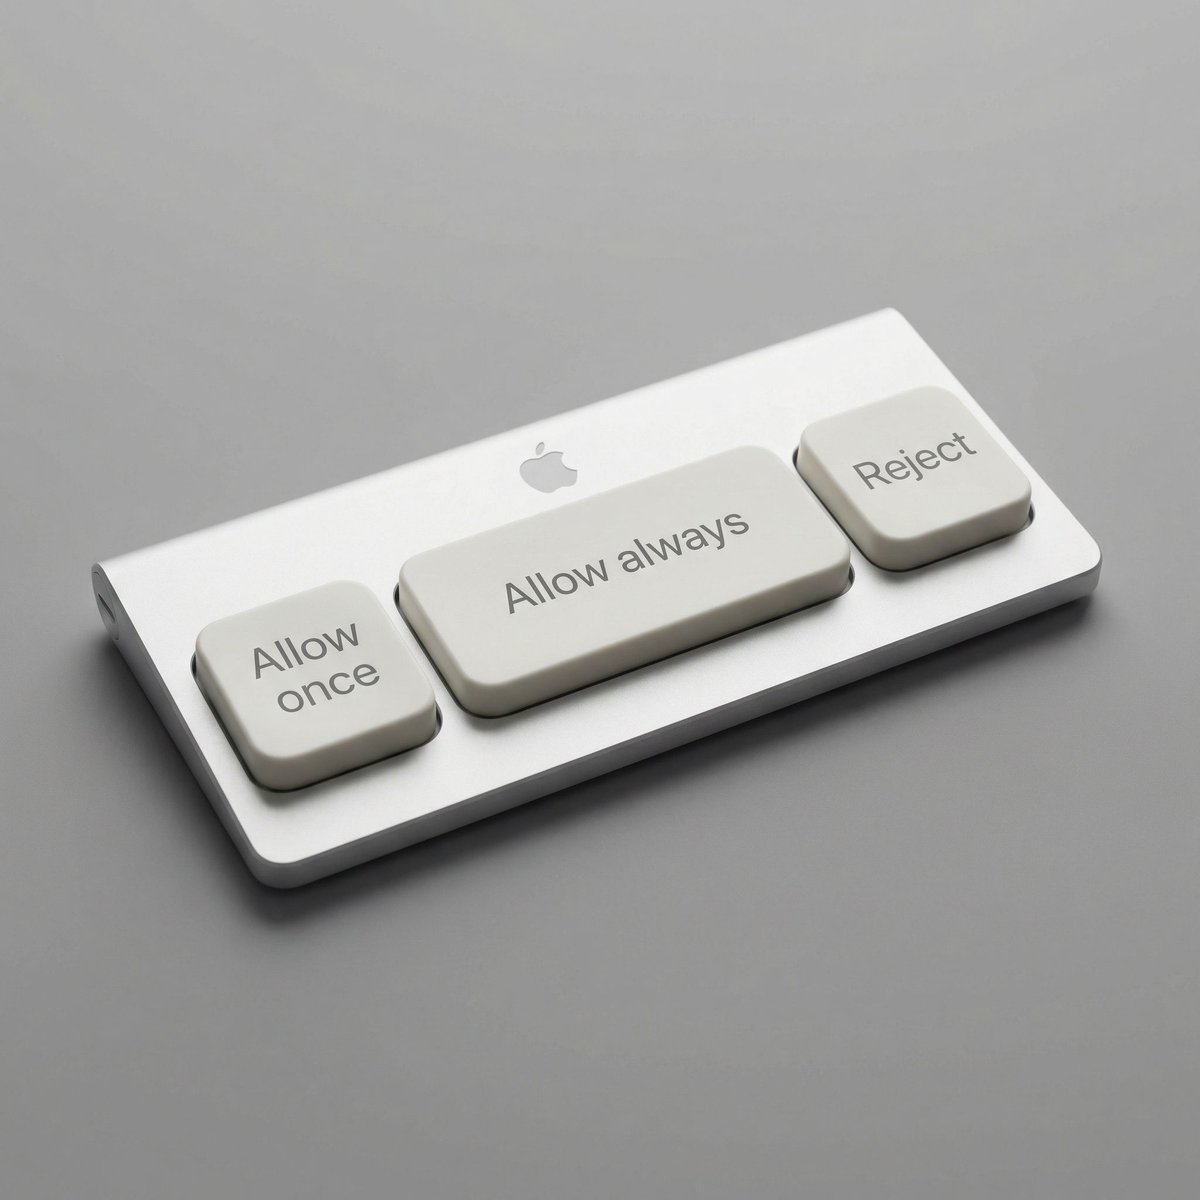
<p>There's <a href="https://x.com/mattrothenberg/status/2031383560062370235" target="_blank" rel="noopener noreferrer" class="">@mattrothenberg</a>'s Apple-industrial-design take — milled aluminum, three soft keys, the whole Cupertino look:</p>
<p><img decoding="async" loading="lazy" alt="Concept render of an Apple-style aluminum keypad with Allow once, Allow always, and Reject keys" src="https://vibekeys.dev/assets/images/ai-concept-apple-style-keypad-d91086fa773545dd7bb4be8ada807d1e.png" width="1200" height="1200" class="img_ev3q"></p>
<p><em>Concept by <a href="https://x.com/mattrothenberg/status/2031383560062370235" target="_blank" rel="noopener noreferrer" class="">@mattrothenberg</a>. Not affiliated with or endorsed by Apple.</em></p>
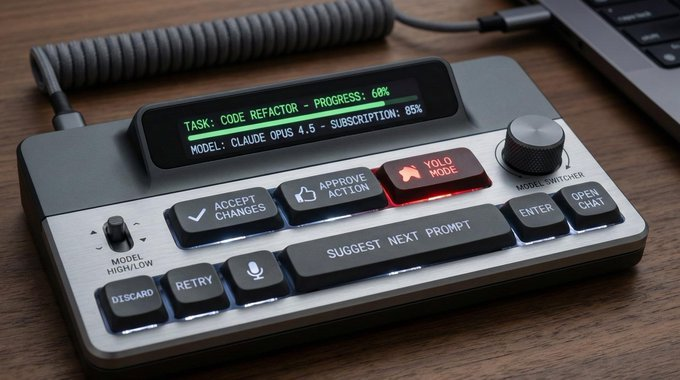
<p>And there's <a href="https://x.com/shiri_shh/status/2016858869729800264" target="_blank" rel="noopener noreferrer" class="">@shiri_shh</a>'s maximalist desk console, with a green status display reading <code>TASK: CODE REFACTOR — PROGRESS: 60%</code>, a YOLO MODE key, a model-switcher knob, accept and retry keys, and a mic:</p>
<p><img decoding="async" loading="lazy" alt="Concept render of a desk console with a green status screen showing task progress and model, plus Accept, Retry, YOLO mode keys, a mic, and a model-switcher knob" src="https://vibekeys.dev/assets/images/ai-concept-status-deck-9447d565c990944804560c6db1f64397.png" width="680" height="380" class="img_ev3q"></p>
<p><em>Concept by <a href="https://x.com/shiri_shh/status/2016858869729800264" target="_blank" rel="noopener noreferrer" class="">@shiri_shh</a> — the same "vibe coder needs this in 2026" tweet that <a class="" href="https://vibekeys.dev/blog/the-story-of-vibekeys/">kicked off our whole story</a>.</em></p>
<p>Every one of these is great, and together they point at the same truth: developers really want this thing to exist. The only catch is that they're concept renders. As of today, you still can't buy one.</p>
<h2 class="anchor anchorTargetStickyNavbar_Vzrq" id="so-we-went-and-built-it">So we went and built it<a href="https://vibekeys.dev/blog/vibe-coding-keyboard-ai-imagined-we-built-it/#so-we-went-and-built-it" class="hash-link" aria-label="Direct link to So we went and built it" title="Direct link to So we went and built it" translate="no">​</a></h2>
<p>A render racking up thousands of likes is the clearest demand signal you can get. People weren't just admiring these images, they were asking how to own one.</p>
<p>So instead of posting one more concept, we did the unglamorous part: picked real switches, wired up a real knob and display, fit a battery, got it pairing over Bluetooth, wrote the firmware, shipped OTA updates, and put it in a box that arrives at your door.</p>
<p>Same idea everyone loved. We just made it something you can hold.</p>
<h2 class="anchor anchorTargetStickyNavbar_Vzrq" id="meet-vibekeys-max-a-real-vibe-coding-keyboard">Meet VibeKeys Max: a real vibe coding keyboard<a href="https://vibekeys.dev/blog/vibe-coding-keyboard-ai-imagined-we-built-it/#meet-vibekeys-max-a-real-vibe-coding-keyboard" class="hash-link" aria-label="Direct link to Meet VibeKeys Max: a real vibe coding keyboard" title="Direct link to Meet VibeKeys Max: a real vibe coding keyboard" translate="no">​</a></h2>
<p>This is VibeKeys Max. It's not a render.</p>
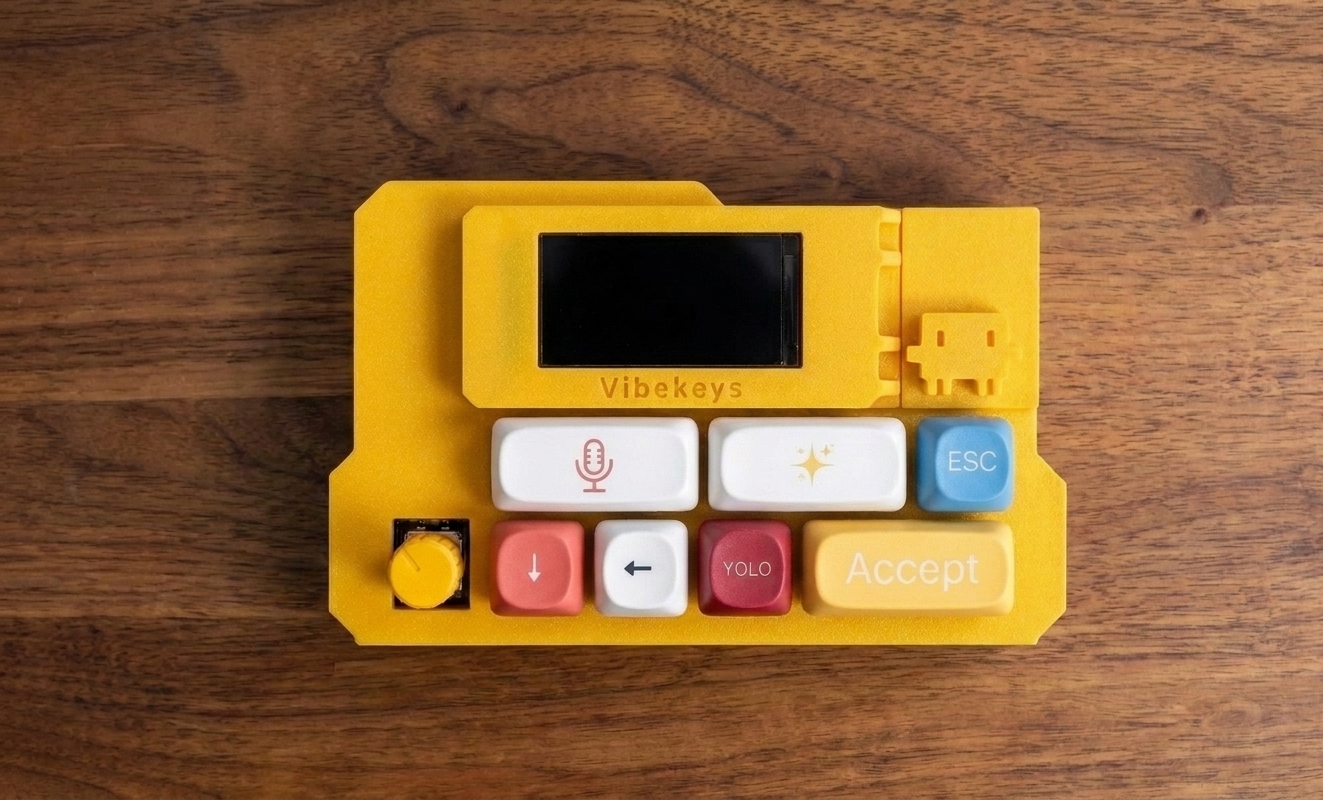
<p><img decoding="async" loading="lazy" alt="VibeKeys Max, a real shipping device: a yellow keypad with an LCD status screen, a mic key, a sparkle/prompt key, ESC, a knob, and a large Accept key, with a little robot mascot" src="https://vibekeys.dev/assets/images/vibekeys-max-v2-5b06ad57ba02f211964969f21e163616.jpg" width="1323" height="800" class="img_ev3q"></p>
<p>Look at what those concept images were all reaching for, and look at what's actually on the desk:</p>
<ul>
<li class=""><strong>A status screen that shows what your agent is doing</strong> — the maximalist render imagined it; VibeKeys Max has a real LCD on board.</li>
<li class=""><strong>A YOLO key</strong> — the meme everyone drew; here it's a physical key you can press.</li>
<li class=""><strong>A microphone, built in</strong> — talk to your agent instead of typing the prompt.</li>
<li class=""><strong>A real knob</strong> — the model-switcher fantasy, except it's wired up and works.</li>
<li class=""><strong>An Accept key, a Reject/back flow, ESC</strong> — the Allow Once / Always Allow / Reject loop, mapped to keys your thumb finds without looking.</li>
</ul>
<p>The renders stopped at "wouldn't this be cool." VibeKeys Max boots up, pairs with your machine, and runs the accept-reject-retry loop you do a hundred times a day — by voice or by key, with the screen telling you where things stand. It even has a face: the little robot peeking off the corner is ours.</p>
<h2 class="anchor anchorTargetStickyNavbar_Vzrq" id="from-a-viral-tweet-to-a-product-you-can-order">From a viral tweet to a product you can order<a href="https://vibekeys.dev/blog/vibe-coding-keyboard-ai-imagined-we-built-it/#from-a-viral-tweet-to-a-product-you-can-order" class="hash-link" aria-label="Direct link to From a viral tweet to a product you can order" title="Direct link to From a viral tweet to a product you can order" translate="no">​</a></h2>
<p>We didn't pull this out of nowhere. VibeKeys started the same place all those renders did — <a class="" href="https://vibekeys.dev/blog/the-story-of-vibekeys/">a tweet that said "vibe coder needs this in 2026"</a> — and then we did the unglamorous part: prototyping, firmware, community feedback, OTA updates, and a manufacturing line.</p>
<p>The difference between us and the timeline full of concepts is simply that we kept going after the screenshot looked good.</p>
<p>If you've been staring at those renders wishing one of them were real: one of them is.</p>
<h2 class="anchor anchorTargetStickyNavbar_Vzrq" id="get-the-real-thing">Get the real thing<a href="https://vibekeys.dev/blog/vibe-coding-keyboard-ai-imagined-we-built-it/#get-the-real-thing" class="hash-link" aria-label="Direct link to Get the real thing" title="Direct link to Get the real thing" translate="no">​</a></h2>
<ul>
<li class=""><strong><a href="https://vibekeys.dev/vibekeys-max.html" target="_blank" rel="noopener noreferrer" class="">VibeKeys Max</a></strong> — the full vision the concepts were chasing: LCD status screen, built-in mic, knob, YOLO key, voice and remote workflows. This is the one to get.</li>
<li class=""><strong><a href="https://vibekeys.dev/vibekeys-plus.html" target="_blank" rel="noopener noreferrer" class="">VibeKeys Plus</a></strong> — the same core flow in a tighter package.</li>
<li class=""><strong><a href="https://vibekeys.dev/vibekeys-pro.html" target="_blank" rel="noopener noreferrer" class="">VibeKeys Pro</a></strong> — production-ready and the most affordable way to put a real accept/reject/retry keypad on your desk today.</li>
</ul>
<p><strong>Looking for a developer gift?</strong> VibeKeys Max is the rare one people actually use — grab one for the coder in your life, or <a href="https://vibekeys.dev/vibekeys-max.html" target="_blank" rel="noopener noreferrer" class="">order a batch</a> as company swag your engineers will keep on their desks.</p>
<p>Stop scrolling past the renders. <a href="https://vibekeys.dev/vibekeys-max.html" target="_blank" rel="noopener noreferrer" class="">Put a real vibe coding keyboard on your desk →</a></p>]]></content>
        <author>
            <name>VibeKeys Team</name>
            <uri>https://vibekeys.dev</uri>
        </author>
        <category label="vibe-coding" term="vibe-coding"/>
        <category label="product" term="product"/>
        <category label="claude-code" term="claude-code"/>
    </entry>
    <entry>
        <title type="html"><![CDATA[VibeKeys Pro vs Plus vs Max: Which One Is Right for You?]]></title>
        <id>https://vibekeys.dev/blog/vibekeys-pro-plus-max-compared/</id>
        <link href="https://vibekeys.dev/blog/vibekeys-pro-plus-max-compared/"/>
        <updated>2026-04-09T00:00:00.000Z</updated>
        <summary type="html"><![CDATA[A side-by-side comparison of VibeKeys Pro, Plus, and Max — connectivity, features, and pricing to help you pick the right model.]]></summary>
        <content type="html"><![CDATA[<p>AI coding tools like Claude Code, Cursor, and Copilot have changed how developers work — but the interface hasn't caught up. You're still reaching for keyboard shortcuts, typing slash commands, and context-switching between your editor and terminal. VibeKeys gives you dedicated physical controls for the actions you repeat hundreds of times a day: accept, reject, retry, voice input, and more.</p>
<p>We make three models — Pro, Plus, and Max — each designed for a different setup and budget. This post breaks down what sets them apart so you can pick the right one.</p>
<h2 class="anchor anchorTargetStickyNavbar_Vzrq" id="the-quick-overview">The Quick Overview<a href="https://vibekeys.dev/blog/vibekeys-pro-plus-max-compared/#the-quick-overview" class="hash-link" aria-label="Direct link to The Quick Overview" title="Direct link to The Quick Overview" translate="no">​</a></h2>
<table><thead><tr><th></th><th><strong>Pro</strong></th><th><strong>Plus</strong></th><th><strong>Max</strong></th></tr></thead><tbody><tr><td><strong>Price</strong></td><td>$29</td><td>$49</td><td>$69 (30% off from $99)</td></tr><tr><td><strong>Connection</strong></td><td>USB-C wired</td><td>Bluetooth + Wi-Fi</td><td>Bluetooth 5.0 + Wi-Fi + USB-C</td></tr><tr><td><strong>Keys</strong></td><td>6 + rotary knob</td><td>6 + rotary knob</td><td>Full ergonomic layout + rotary knob</td></tr><tr><td><strong>Display</strong></td><td>—</td><td>—</td><td>OLED status screen</td></tr><tr><td><strong>Microphone</strong></td><td>—</td><td>—</td><td>Built-in mic</td></tr><tr><td><strong>Battery</strong></td><td>N/A (wired)</td><td>Up to 15 days</td><td>Rechargeable</td></tr><tr><td><strong>Platform</strong></td><td>macOS, Windows</td><td>macOS, Windows, Linux</td><td>macOS, Windows, Linux</td></tr><tr><td><strong>Switches</strong></td><td>Clicky mechanical</td><td>Clicky mechanical</td><td>Premium mechanical</td></tr><tr><td><strong>Customizable case</strong></td><td>—</td><td>—</td><td>3D printed, choose color + custom text</td></tr><tr><td><strong>Firmware</strong></td><td>Closed</td><td>Closed</td><td>Open source</td></tr><tr><td><strong>Shipping</strong></td><td>Free worldwide</td><td>Free worldwide</td><td>Free worldwide</td></tr></tbody></table>
<h2 class="anchor anchorTargetStickyNavbar_Vzrq" id="vibekeys-pro--the-starting-point">VibeKeys Pro — The Starting Point<a href="https://vibekeys.dev/blog/vibekeys-pro-plus-max-compared/#vibekeys-pro--the-starting-point" class="hash-link" aria-label="Direct link to VibeKeys Pro — The Starting Point" title="Direct link to VibeKeys Pro — The Starting Point" translate="no">​</a></h2>
<p><strong>$29 USD | USB-C wired | 6 keys + knob</strong></p>
<p>Pro is the entry point. Six programmable keys and a rotary knob give you tactile shortcuts for the actions you repeat most: accept, reject, retry, YOLO mode, voice input, and usage stats. The clicky mechanical switches feel deliberate, and the compact layout keeps everything within reach.</p>
<p>The wired USB-C connection means zero latency and no charging — just plug in and go. PBT keycaps with laser-etched legends keep the labels readable over time.</p>
<p><strong>Best for:</strong> Developers who want a simple, affordable companion for AI coding at a fixed desk setup. If you work at one station and want physical buttons for Claude Code, Cursor, Copilot, or Codex without any setup complexity, Pro is the right call.</p>
<h2 class="anchor anchorTargetStickyNavbar_Vzrq" id="vibekeys-plus--cut-the-cable">VibeKeys Plus — Cut the Cable<a href="https://vibekeys.dev/blog/vibekeys-pro-plus-max-compared/#vibekeys-plus--cut-the-cable" class="hash-link" aria-label="Direct link to VibeKeys Plus — Cut the Cable" title="Direct link to VibeKeys Plus — Cut the Cable" translate="no">​</a></h2>
<p><strong>$49 USD | Bluetooth + Wi-Fi | 6 keys + knob</strong></p>
<p>Plus takes the same compact 6-key layout from Pro and adds wireless connectivity. Bluetooth for direct pairing, Wi-Fi for more flexibility across your workspace. The 15-day battery life means you're not constantly reaching for a charger.</p>
<p>The key layout and workflow stay intentionally close to Pro — upgrading doesn't mean relearning. It also adds Linux support, which Pro doesn't have.</p>
<p><strong>Best for:</strong> Developers who want the Pro experience without a cable. If you move between setups, prefer a cleaner desk, or work on Linux, Plus is the natural upgrade. The $20 premium over Pro buys you wireless freedom and a longer platform support list.</p>
<h2 class="anchor anchorTargetStickyNavbar_Vzrq" id="vibekeys-max--the-full-experience">VibeKeys Max — The Full Experience<a href="https://vibekeys.dev/blog/vibekeys-pro-plus-max-compared/#vibekeys-max--the-full-experience" class="hash-link" aria-label="Direct link to VibeKeys Max — The Full Experience" title="Direct link to VibeKeys Max — The Full Experience" translate="no">​</a></h2>
<p><strong>$69 USD (normally $99) | Bluetooth 5.0 + Wi-Fi + USB-C | Full keyboard + knob + OLED + mic</strong></p>
<p>Max is a different category. It's not just a keypad — it's a dual-mode device. In <strong>Keyboard Mode</strong>, it works at your desk as a full ergonomic keyboard interface for vibe coding. In <strong>Remote Mode</strong>, the built-in microphone lets you interact with Claude Code from across the room using voice.</p>
<p>The OLED display shows real-time status — what Claude Code is doing, build progress, mode indicators. The firmware is fully open source, and you can update it over the air via Wi-Fi.</p>
<p><strong>A great gift for developers.</strong> Every Max unit is 3D printed to order, so you can make it personal. Choose your case color — match their setup, their favorite color, or just make it stand out. Then add custom text: a name, a team motto, a inside joke, whatever makes it theirs. It's a thoughtful, useful gift that most developers wouldn't buy for themselves but will actually use every day.</p>
<p><strong>Best for:</strong> Developers who want a complete AI coding interface that works both at the desk and away from it. If you use Claude Code's voice features, want an OLED status display, or care about open source firmware you can customize and extend, Max is the one. Also the best pick if you're shopping for a developer who already has everything — the customization makes it one-of-a-kind.</p>
<h2 class="anchor anchorTargetStickyNavbar_Vzrq" id="how-to-choose">How to Choose<a href="https://vibekeys.dev/blog/vibekeys-pro-plus-max-compared/#how-to-choose" class="hash-link" aria-label="Direct link to How to Choose" title="Direct link to How to Choose" translate="no">​</a></h2>
<p><strong>Start with your workspace:</strong></p>
<ul>
<li class=""><strong>Fixed desk, simple needs</strong> → <strong>Pro</strong> ($29). Plug in, map your keys, done. No charging, no pairing, no complexity.</li>
<li class=""><strong>Mobile or multi-desk</strong> → <strong>Plus</strong> ($49). Same compact concept, now wireless. The 15-day battery makes it practical day-to-day.</li>
<li class=""><strong>Voice-first or remote coding</strong> → <strong>Max</strong> ($69). The built-in mic and dual-mode design let you code from the couch, the whiteboard, or anywhere in the room.</li>
</ul>
<p><strong>Start with your budget:</strong></p>
<p>All three include free worldwide shipping. Pro at $29 is an easy way to try the VibeKeys concept. Plus at $49 is the sweet spot for wireless. Max at $69 (currently 30% off) is the full package with features you won't find in the other two — OLED, mic, open source firmware, and customization.</p>
<h2 class="anchor anchorTargetStickyNavbar_Vzrq" id="they-all-share-the-same-dna">They All Share the Same DNA<a href="https://vibekeys.dev/blog/vibekeys-pro-plus-max-compared/#they-all-share-the-same-dna" class="hash-link" aria-label="Direct link to They All Share the Same DNA" title="Direct link to They All Share the Same DNA" translate="no">​</a></h2>
<p>Every VibeKeys model is designed around the same idea: vibe coding works better with physical controls. Whether you're accepting AI suggestions, triggering voice input, or scrolling through diffs, a dedicated key beats a keyboard shortcut. The three models just give you different levels of that experience.</p>
<p>Pick the one that matches how and where you code. You can always upgrade later — the workflow transfers.</p>
<hr>
<p>Ready to order? Check out <a href="https://vibekeys.dev/vibekeys-pro.html" target="_blank" rel="noopener noreferrer" class="">VibeKeys Pro</a>, <a href="https://vibekeys.dev/vibekeys-plus.html" target="_blank" rel="noopener noreferrer" class="">VibeKeys Plus</a>, or <a href="https://vibekeys.dev/vibekeys-max.html" target="_blank" rel="noopener noreferrer" class="">VibeKeys Max</a>.</p>]]></content>
        <author>
            <name>VibeKeys Team</name>
            <uri>https://vibekeys.dev</uri>
        </author>
        <category label="product" term="product"/>
        <category label="vibe-coding" term="vibe-coding"/>
    </entry>
    <entry>
        <title type="html"><![CDATA[VibeKeys Max Update: Keyboard Mode, Live Claude Code Status, and OTA Firmware Updates]]></title>
        <id>https://vibekeys.dev/blog/vibekeys-max-keyboard-mode-claude-code-status-ota/</id>
        <link href="https://vibekeys.dev/blog/vibekeys-max-keyboard-mode-claude-code-status-ota/"/>
        <updated>2026-04-08T00:00:00.000Z</updated>
        <summary type="html"><![CDATA[VibeKeys Max now supports Bluetooth keyboard mode with live Claude Code status on the screen, custom key mappings, and wireless OTA firmware updates.]]></summary>
        <content type="html"><![CDATA[<p>VibeKeys Max just got a major update — three new capabilities that change how you interact with your device and with Claude Code.</p>
<h2 class="anchor anchorTargetStickyNavbar_Vzrq" id="keyboard-mode">Keyboard Mode<a href="https://vibekeys.dev/blog/vibekeys-max-keyboard-mode-claude-code-status-ota/#keyboard-mode" class="hash-link" aria-label="Direct link to Keyboard Mode" title="Direct link to Keyboard Mode" translate="no">​</a></h2>
<p>VibeKeys Max now suppots Keyboard mode by default. Pair over Bluetooth, and VibeKeys Max becomes a dedicated Claude Code controller. Every key sends input directly to your computer. The defaults are tuned for Claude Code workflows — <code>/compact</code>, page scroll, accept, escape, YOLO — and every key is remappable if you need something different.</p>
<p>No server. No WiFi. No setup beyond Bluetooth pairing.</p>
<p><a class="" href="https://vibekeys.dev/docs/keyboard-mode/">Keyboard Mode guide</a> | <a class="" href="https://vibekeys.dev/docs/customize-keys/">Customize Key Mappings</a></p>
<h2 class="anchor anchorTargetStickyNavbar_Vzrq" id="live-claude-code-status-on-the-screen">Live Claude Code Status on the Screen<a href="https://vibekeys.dev/blog/vibekeys-max-keyboard-mode-claude-code-status-ota/#live-claude-code-status-on-the-screen" class="hash-link" aria-label="Direct link to Live Claude Code Status on the Screen" title="Direct link to Live Claude Code Status on the Screen" translate="no">​</a></h2>
<p>When you are deep in a coding session with Claude Code, context switching is expensive. Checking the terminal to see if Claude is still thinking — or already waiting for you — pulls you out of whatever you were reading, reviewing, or planning next.</p>
<p>The VibeKeys Max screen now shows Claude Code's status in real time. You can see whether it is thinking, generating, planning, or done and waiting for your input. It turns the keyboard into a passive status indicator — like a build light on your desk, but for your AI coding agent. A quick glance is all it takes to stay in sync without breaking your flow.</p>
<p><a class="" href="https://vibekeys.dev/docs/claude-code-status/">Claude Code Status Integration guide</a></p>
<h2 class="anchor anchorTargetStickyNavbar_Vzrq" id="ota-firmware-updates">OTA Firmware Updates<a href="https://vibekeys.dev/blog/vibekeys-max-keyboard-mode-claude-code-status-ota/#ota-firmware-updates" class="hash-link" aria-label="Direct link to OTA Firmware Updates" title="Direct link to OTA Firmware Updates" translate="no">​</a></h2>
<p>Until now, updating firmware meant finding a USB cable, opening a flashing tool, and going through a multi-step process. That friction meant most users stayed on whatever version shipped from the factory — even when newer firmware brought real improvements.</p>
<p>OTA updates remove that barrier entirely. If your device is connected to WiFi, you can update the firmware wirelessly from your browser in a few minutes. No cables, no drivers, no flashing tools. This means we can ship improvements faster and you can actually receive them.</p>
<p>The USB-based ESP LaunchPad method is still available for recovery and factory resets.</p>
<p><a class="" href="https://vibekeys.dev/docs/flashing-firmware/">Updating Firmware guide</a></p>
<h2 class="anchor anchorTargetStickyNavbar_Vzrq" id="for-existing-users-received-before-april-10th">For Existing Users (Received Before April 10th)<a href="https://vibekeys.dev/blog/vibekeys-max-keyboard-mode-claude-code-status-ota/#for-existing-users-received-before-april-10th" class="hash-link" aria-label="Direct link to For Existing Users (Received Before April 10th)" title="Direct link to For Existing Users (Received Before April 10th)" translate="no">​</a></h2>
<p>If you already have a VibeKeys Max, here is how to get all the new features.</p>
<p><strong>Layout change:</strong> The positions of the "Plan" key and the "Delete" key have been swapped in the latest firmware. To apply this and all other updates, please reflash the firmware using the <a href="https://vibekeys.dev/docs/flashing-firmware#method-2-esp-launchpad-recoveryfactory-reset" target="_blank" rel="noopener noreferrer" class="">ESP LaunchPad method</a>.</p>
<p>After reflashing:</p>
<ul>
<li class="">Your device will default to <strong>keyboard mode</strong> — just pair over Bluetooth and you are ready to go</li>
<li class="">To enable <strong>real-time Claude Code status</strong> on the screen, install the plugin by following the <a class="" href="https://vibekeys.dev/docs/claude-code-status/">Claude Code Status Integration guide</a></li>
<li class="">To <strong>customize key mappings</strong>, see the <a class="" href="https://vibekeys.dev/docs/customize-keys/">Customize Keys guide</a></li>
</ul>
<p>Enjoy vibe coding!</p>]]></content>
        <author>
            <name>VibeKeys Team</name>
            <uri>https://vibekeys.dev</uri>
        </author>
        <category label="product" term="product"/>
        <category label="vibekeys-max" term="vibekeys-max"/>
        <category label="keyboard-mode" term="keyboard-mode"/>
        <category label="claude-code" term="claude-code"/>
        <category label="ota" term="ota"/>
        <category label="firmware" term="firmware"/>
    </entry>
    <entry>
        <title type="html"><![CDATA[Vibe Coding with Claude Code Voice Mode and VibeKeys Pro]]></title>
        <id>https://vibekeys.dev/blog/claude-code-voice-mode/</id>
        <link href="https://vibekeys.dev/blog/claude-code-voice-mode/"/>
        <updated>2026-03-03T00:00:00.000Z</updated>
        <summary type="html"><![CDATA[How to set up VibeKeys Pro for push-to-talk voice coding with Claude Code's built-in voice support]]></summary>
        <content type="html"><![CDATA[<p>Vibe coding is about staying in flow — describing what you want, letting the AI build it, and never breaking your train of thought. Voice typing takes that further: instead of typing your prompts, you just speak them. The less friction between your idea and Claude, the better the session.</p>
<p>Claude Code has built-in voice support. With the right key mapping on VibeKeys Pro, you can trigger it and speak hands-free — no keyboard reach required.</p>
<h2 class="anchor anchorTargetStickyNavbar_Vzrq" id="voice-typing-and-vibe-coding">Voice Typing and Vibe Coding<a href="https://vibekeys.dev/blog/claude-code-voice-mode/#voice-typing-and-vibe-coding" class="hash-link" aria-label="Direct link to Voice Typing and Vibe Coding" title="Direct link to Voice Typing and Vibe Coding" translate="no">​</a></h2>
<p>Typing is still a context switch. You stop thinking about the problem, shift to the keyboard, form sentences with your fingers, and then go back to thinking. Voice typing removes that switch. You stay in idea mode the whole time.</p>
<p>For vibe coding specifically — where you are describing architecture, asking for changes, or walking Claude through a problem — speaking feels more natural than typing. You think in sentences, not keystrokes.</p>
<p>The challenge is that voice input on a laptop still requires you to reach for the keyboard to start and stop recording. VibeKeys Pro solves that with dedicated physical controls.</p>
<h2 class="anchor anchorTargetStickyNavbar_Vzrq" id="the-setup">The Setup<a href="https://vibekeys.dev/blog/claude-code-voice-mode/#the-setup" class="hash-link" aria-label="Direct link to The Setup" title="Direct link to The Setup" translate="no">​</a></h2>
<p><strong>Step 1: Download the VibeKeys Configurator</strong></p>
<p><a href="https://vibekeys.dev/download.html" target="_blank" rel="noopener noreferrer" class="">Download the VibeKeys Configurator</a> for macOS or Windows. Launch the app and it will detect your connected VibeKeys Pro automatically.</p>
<p>Then configure two key mappings:</p>
<p><strong>Step 2: Voice key → <code>/voice</code> + Enter</strong></p>
<p>Assign your dedicated voice button to send the <code>/voice</code> command followed by Enter. This enters Claude Code's voice mode in one press.</p>
<p><strong>Step 3: Knob press → Space (hold)</strong></p>
<p>Once in voice mode, hold down the knob while you speak. Claude Code uses the spacebar as a push-to-talk trigger — hold to record, release to send.</p>
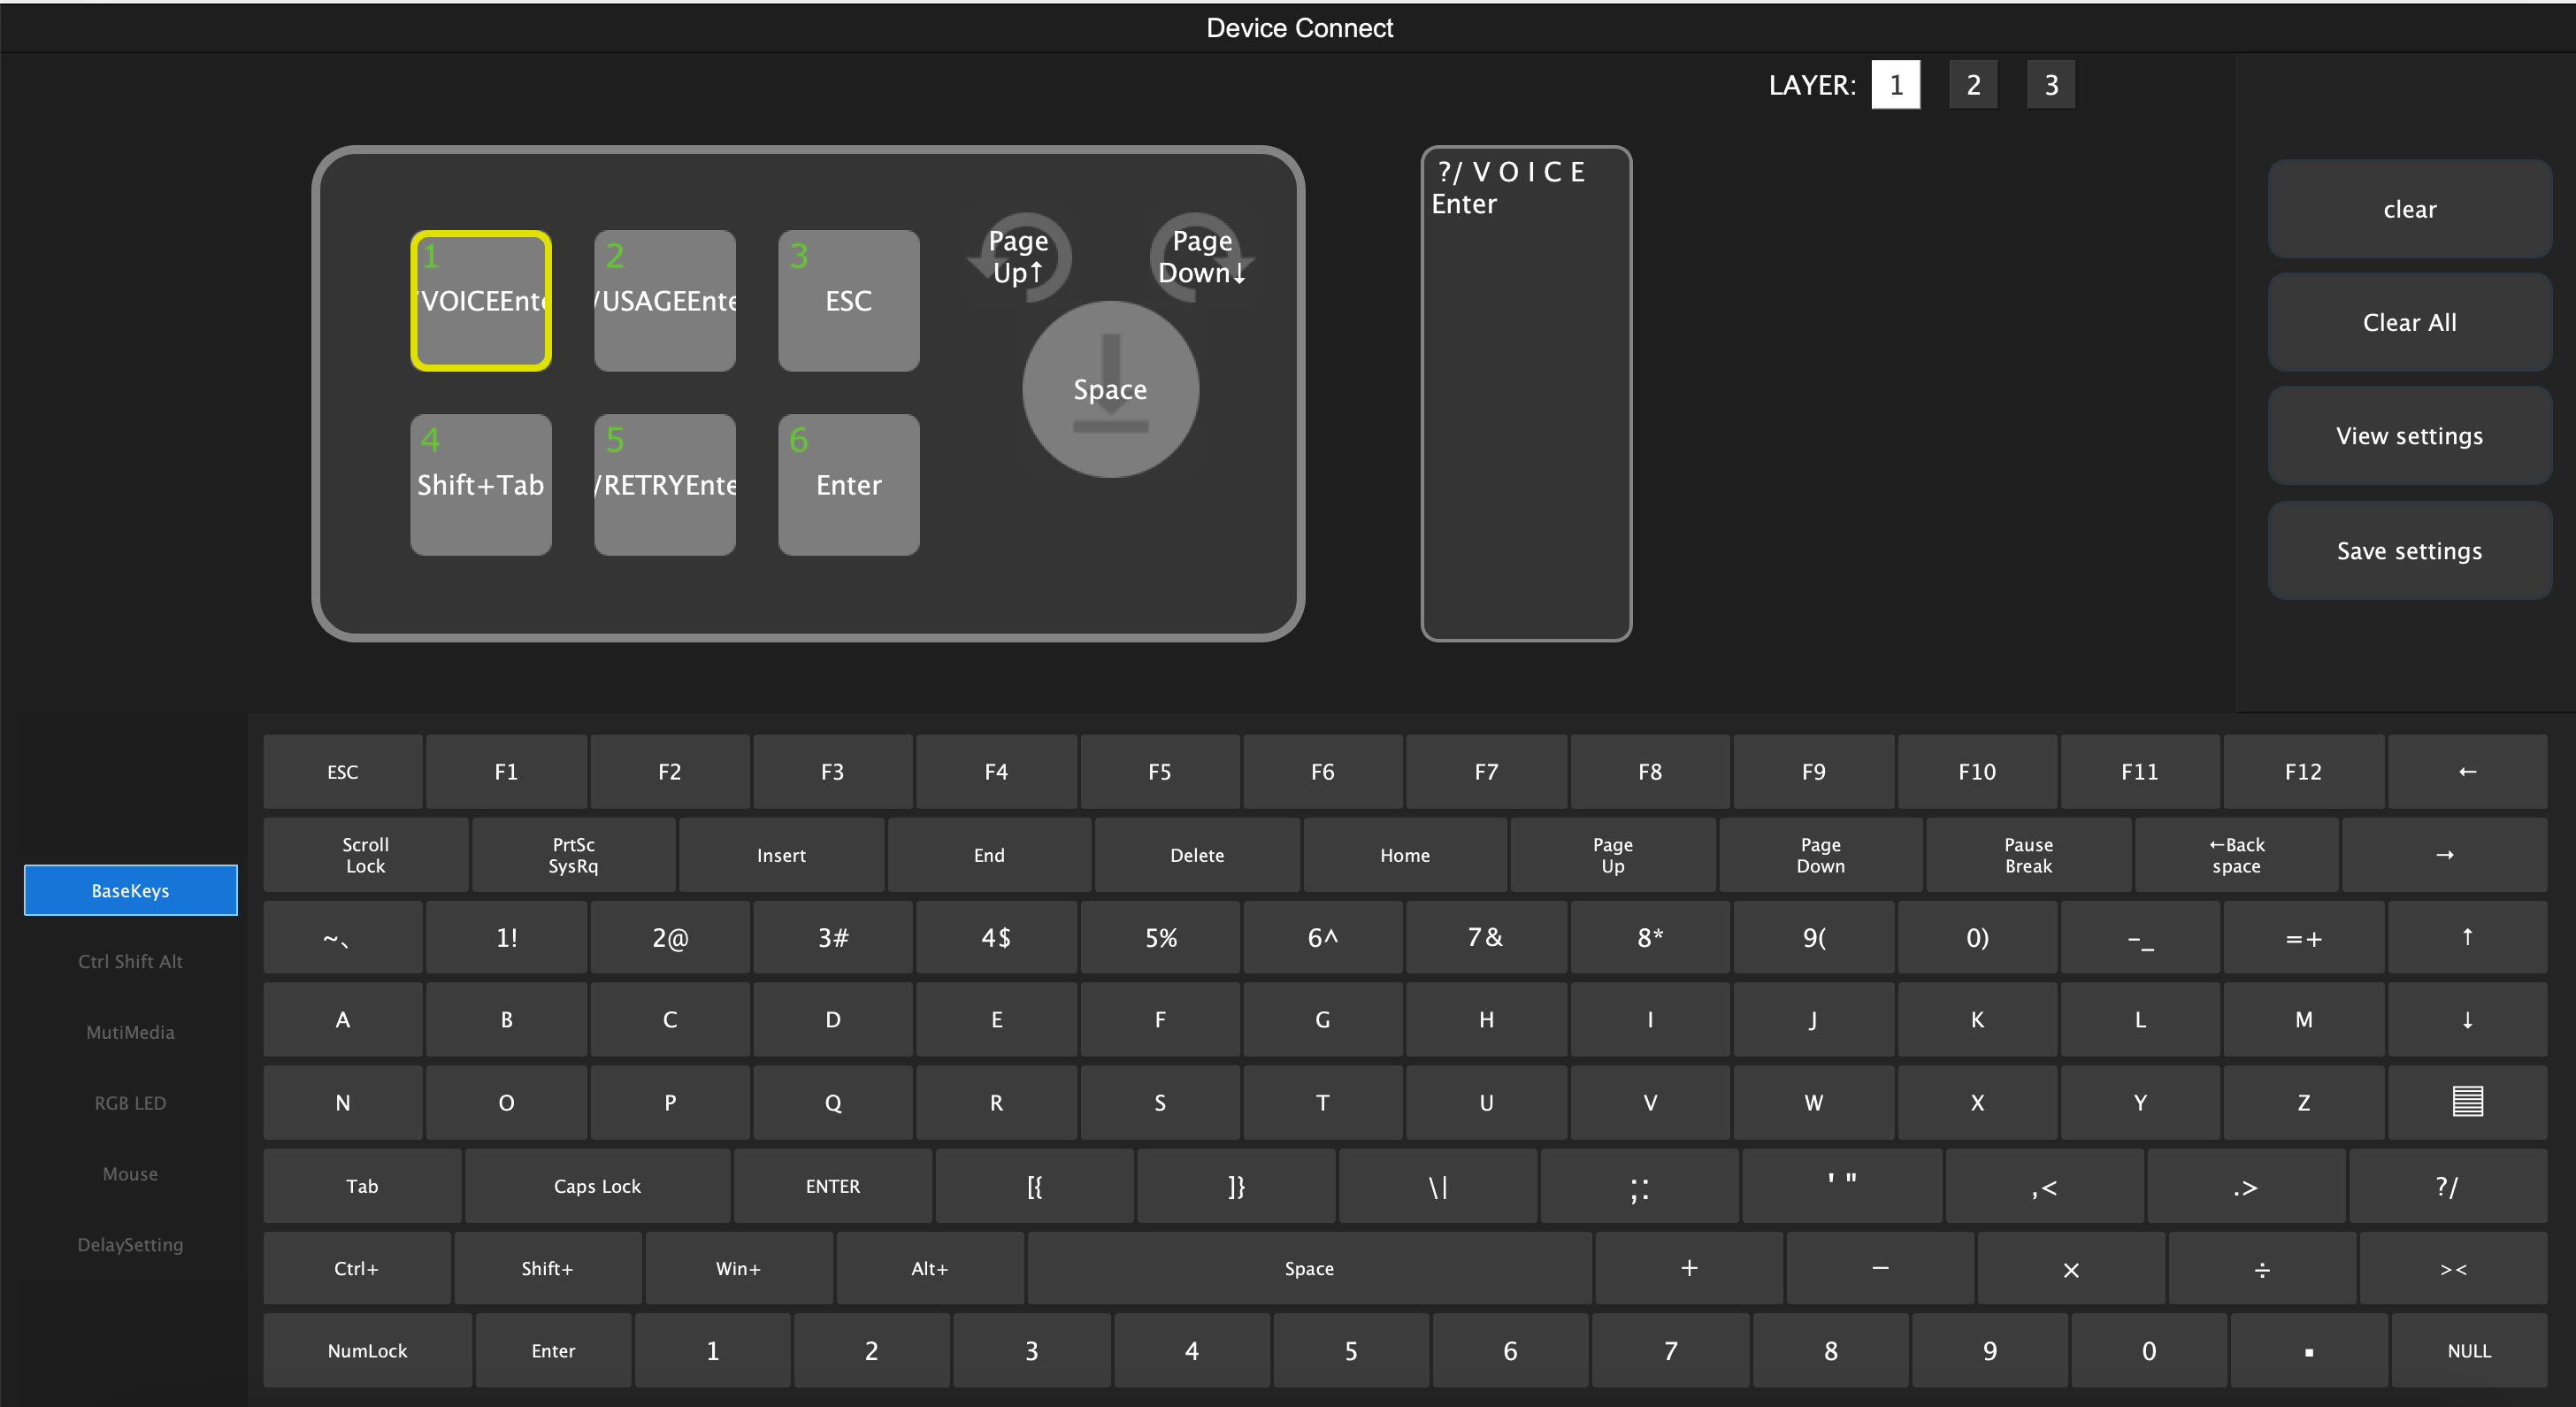
<p>This key map shows one way to customize VibeKeys Pro for Claude Code voice mode, with dedicated buttons for voice entry, usage prompts, retry, and navigation.</p>
<p><img decoding="async" loading="lazy" alt="Customized VibeKeys Pro layout for Claude Code voice mode" src="https://vibekeys.dev/assets/images/claude-built-in-voice-vibeleys-pro-01-17d51683ebd470d2de38b6df6d240ec0.png" width="2912" height="1590" class="img_ev3q"></p>
<h2 class="anchor anchorTargetStickyNavbar_Vzrq" id="the-workflow">The Workflow<a href="https://vibekeys.dev/blog/claude-code-voice-mode/#the-workflow" class="hash-link" aria-label="Direct link to The Workflow" title="Direct link to The Workflow" translate="no">​</a></h2>
<ol>
<li class="">Press the <strong>voice key</strong> — Claude Code enters voice mode</li>
<li class="">Hold the <strong>knob</strong> while speaking your prompt</li>
<li class="">Release the knob — transcription is sent</li>
<li class="">Repeat</li>
</ol>
<p>No keyboard. No mouse. Just speak and vibe.</p>
<p>You can see the workflow in action here:</p>
<div style="position:relative;padding-bottom:56.25%;height:0;overflow:hidden;max-width:100%;border-radius:8px;margin:2rem 0"><iframe src="https://www.youtube.com/embed/Ad4WQ7ZEJrU" title="Claude Code Voice Mode" frameborder="0" allow="accelerometer; autoplay; clipboard-write; encrypted-media; gyroscope; picture-in-picture" allowfullscreen="" style="position:absolute;top:0;left:0;width:100%;height:100%;border:0"></iframe></div>
<p><a href="https://youtu.be/Ad4WQ7ZEJrU" target="_blank" rel="noopener noreferrer" class="">Watch on YouTube</a></p>
<h2 class="anchor anchorTargetStickyNavbar_Vzrq" id="why-this-works-well">Why This Works Well<a href="https://vibekeys.dev/blog/claude-code-voice-mode/#why-this-works-well" class="hash-link" aria-label="Direct link to Why This Works Well" title="Direct link to Why This Works Well" translate="no">​</a></h2>
<p>The knob is a natural push-to-talk control. It sits under your thumb, requires no visual confirmation, and the physical feedback tells you when you are recording. Compared to reaching for a keyboard shortcut mid-thought, it keeps the speaking flow intact.</p>
<p>The voice key handles the mode switch so you never have to type <code>/voice</code> manually. One press and you are ready to speak.</p>
<p>This is the kind of workflow VibeKeys Pro was built for — turning repetitive interactions into physical muscle memory.</p>]]></content>
        <author>
            <name>VibeKeys Team</name>
            <uri>https://vibekeys.dev</uri>
        </author>
        <category label="claude-code" term="claude-code"/>
        <category label="voice" term="voice"/>
        <category label="workflow" term="workflow"/>
    </entry>
    <entry>
        <title type="html"><![CDATA[The Story of VibeKeys]]></title>
        <id>https://vibekeys.dev/blog/the-story-of-vibekeys/</id>
        <link href="https://vibekeys.dev/blog/the-story-of-vibekeys/"/>
        <updated>2026-02-10T00:00:00.000Z</updated>
        <summary type="html"><![CDATA[How a tweet turned into the VibeKeys product line]]></summary>
        <content type="html"><![CDATA[<h2 class="anchor anchorTargetStickyNavbar_Vzrq" id="the-spark">The Spark<a href="https://vibekeys.dev/blog/the-story-of-vibekeys/#the-spark" class="hash-link" aria-label="Direct link to The Spark" title="Direct link to The Spark" translate="no">​</a></h2>
<p>It all started with a single tweet.</p>
<p>One day in early 2026, <a href="https://x.com/shiri_shh/status/2009973702314864680" target="_blank" rel="noopener noreferrer" class="">shiri_shh posted something simple</a>: <em>"Vibe coder needs this in 2026"</em></p>
<p>Attached was an image of a keypad with AI capabilities. That's it.</p>
<p>But those 6 words hit different.</p>
<p>We looked at it and thought: Wait. This isn't just a meme. This is actually <em>incredibly useful</em>. The idea of an AI coding keypad that streamlines programming workflows felt like the natural evolution of how we should interact with code. No more endless keyboard shortcuts. No more context switching. Just flow.</p>
<p>We decided to share the idea on Reddit and see if others felt the same way. <a href="https://www.reddit.com/r/vibecoding/comments/1qdnss0/im_actually_going_to_build_a_real_vibe_coding/" target="_blank" rel="noopener noreferrer" class="">We posted</a>: "Is this actually something people would use?"</p>
<h2 class="anchor anchorTargetStickyNavbar_Vzrq" id="community-validation">Community Validation<a href="https://vibekeys.dev/blog/the-story-of-vibekeys/#community-validation" class="hash-link" aria-label="Direct link to Community Validation" title="Direct link to Community Validation" translate="no">​</a></h2>
<p>The response blew us away.</p>
<p>Developers got it immediately. They saw the same pain points we did every single day: repetitive keystrokes, interrupted flow, and the mental load of remembering hundreds of key combinations. The feedback was clear: this wasn't just a fun idea. It was something people genuinely wanted.</p>
<p>So we started building.</p>
<h2 class="anchor anchorTargetStickyNavbar_Vzrq" id="from-prototype-to-product">From Prototype to Product<a href="https://vibekeys.dev/blog/the-story-of-vibekeys/#from-prototype-to-product" class="hash-link" aria-label="Direct link to From Prototype to Product" title="Direct link to From Prototype to Product" translate="no">​</a></h2>
<p>We locked ourselves in, wrote the code, and wired up the hardware. After days of intense development, we had something. It wasn't polished. <a href="https://www.reddit.com/r/vibecoding/comments/1qrau03/updates_a_working_vibe_coding_keyboard_demo/" target="_blank" rel="noopener noreferrer" class="">It was raw and experimental</a>. But it worked.</p>
<p>We shared the demo, and the community responded again.</p>
<p>Then came the question that opened up a bigger direction: <em><a href="https://www.reddit.com/r/vibecoding/comments/1r05ce2/should_i_add_a_mic_to_this_vibe_coding_keyboard/" target="_blank" rel="noopener noreferrer" class="">Should we add a mic?</a></em></p>
<p>With a built-in microphone, you would not need to stay tethered to your computer. You could work from a distance, use voice commands naturally, and let the keypad act as a more independent device. That was the moment VibeKeys Max really started to take shape.</p>
<p>VibeKeys Max became our vision for the ultimate AI coding keypad: physical controls for Claude Code, Codex, and Cursor, combined with voice and AI.</p>
<h2 class="anchor anchorTargetStickyNavbar_Vzrq" id="two-paths-forward">Two Paths Forward<a href="https://vibekeys.dev/blog/the-story-of-vibekeys/#two-paths-forward" class="hash-link" aria-label="Direct link to Two Paths Forward" title="Direct link to Two Paths Forward" translate="no">​</a></h2>
<p>At the same time, we knew not everyone wanted to wait for that future. Some developers wanted something they could use right away.</p>
<p>So we created VibeKeys Pro.</p>
<p>Built on top of proven foundations and shaped by community feedback, VibeKeys Pro is the production-ready AI coding keypad you can order today. It takes the core idea of vibe coding and turns it into a practical tool for real development workflows.</p>
<ul>
<li class=""><strong>VibeKeys Max</strong>: our forward-looking version with voice and remote workflows</li>
<li class=""><strong>VibeKeys Pro</strong>: available now, production-ready, and ready to ship</li>
</ul>
<h2 class="anchor anchorTargetStickyNavbar_Vzrq" id="the-story-continues">The Story Continues<a href="https://vibekeys.dev/blog/the-story-of-vibekeys/#the-story-continues" class="hash-link" aria-label="Direct link to The Story Continues" title="Direct link to The Story Continues" translate="no">​</a></h2>
<p>The project keeps evolving through fast iteration, community feedback, and hands-on experiments with how developers want to work with coding agents.</p>
<p>At the end of the day, this is not just our product. It is a collaboration with every developer who has thought, "there has to be a better way to code."</p>
<p>If you want to follow the journey:</p>
<ul>
<li class=""><a href="https://vibekeys.dev/vibekeys-pro.html" target="_blank" rel="noopener noreferrer" class="">Explore VibeKeys Pro</a></li>
<li class=""><a href="https://vibekeys.dev/vibekeys-max.html" target="_blank" rel="noopener noreferrer" class="">Learn about VibeKeys Max</a></li>
<li class=""><a href="https://x.com/secondstateinc" target="_blank" rel="noopener noreferrer" class="">Follow us on X</a></li>
</ul>]]></content>
        <author>
            <name>VibeKeys Team</name>
            <uri>https://vibekeys.dev</uri>
        </author>
        <category label="product" term="product"/>
        <category label="story" term="story"/>
        <category label="vibe-coding" term="vibe-coding"/>
    </entry>
</feed>